Class 2 – Parenting, Nulls and Expressions
Main class concepts
- preparing and importing artwork from Adobe Illustrator
- parenting layers and properties
- expressions
- time
- values
- wavy motions with sin and cos
- if statements and comparisons
- wiggle
- round values
- random
Importing Artwork
In this session we are going to work with Material that we created in Illustrator. Here’s how to prepare artwork in Illustrator and how to import it in AE.
Prepare Artwork
Import into AE
Better Workflow with “Overlord”
If you work a lot with AI and AE together you might want to get Battleaxe – Overlord. A plugin that makes transferring between the two programs an easy task.
Parenting
Parenting is the process of setting up multiple layers so that the movement of one layer follows the movement (rotation, scale, anchor points and position) of another layer. In animation a more complex setup of multiple layers and parents is also often called Rig and creating such is called rigging. Most often this is used when animating characters. Here are some examples on dribbble.
Parenting layers with parent pick whip
Use the parent pick whip tool to parent one layer to another.
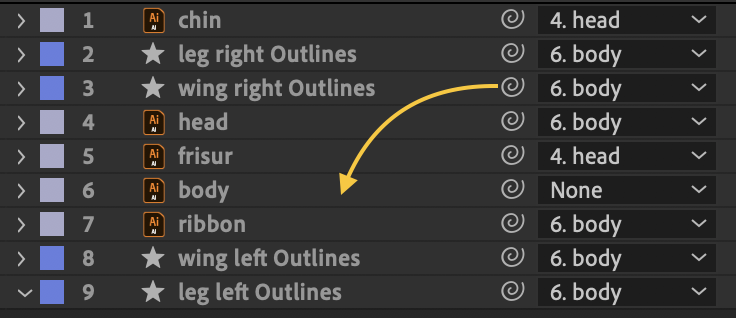
Click and drag it from layer A to layer B.
Layer A then follows layer B.
Parent single properties with property pick whip
If you for example want only the rotation of layer A to be the exact same value of layer B’s rotation you can do this by dragging the property pick whip.
This adds an expression to layer B’s value that tells it layer A’s value.
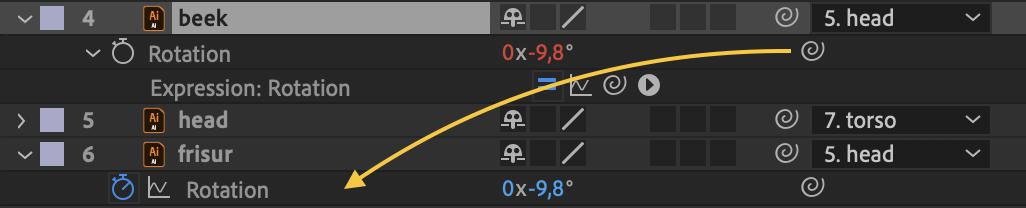
You can even pick whip one properties value to a completely different property.
F.e. try this with two layers and pick whip one’s rotation to the others x-position.
Practice Example – Sun, Moon Stars
Earth and Moon rotation with time
Move Moon around Earth with Math.sin and Math.cos
Math.sin and Math.cos explained
Hide Moon behind Sun with if statement
Explanation if and else statement
Let stars blink with wiggle and Math.round
Know How
-
Keyboard shortcuts – After Effects
For all shortcuts the following rules apply:
- On Windows → Command = Strg
- On older Keyboards and on Windows → option = Alt
To quickly open the different “Transform” properties of a selected layer in AE press the following keys:
P Position R Rotation S Scale T Opacity (think t like transcparency) A Anchor Point To navigate in the timeline you may use the following shortcuts:
J / K Go to previous (J) or next (K) visible item in time ruler
(keyframe, layer marker, work area beginning or end)I go to in point (start) of selected layer O go to out point (end) of selected layer U show only properties with keyframes UU show only properties that have been modified E show effects EE properties with expressions command + arrow left/right go one frame back/forward To show certain other properties:
F Mask Feather M Mask Path TT Mask Opacity L Audio Levels LL Audio Waveform RR Time Remap Adding, manipulating and navigating markers:
shift + 0 Add marker called “0” shift + 1 Add marker called “1” shift + … this goes for all numbers 0 go to marker “0” 1 go to marker “1” … same with other numbers
-
Expressions
Overview
Expressions are a powerful addition to regular animating with keyframes. They are based on javascript an you can animate layers in a lot of ways by writing a few lines of code.
Once you get over the little “I’m afraid of programming” hurdle expressions will give you so so many opportunities to animate easier and quicker and will improve your workflow immensely.
And you’ll learn some basic Javascript on the way. Win win!!
How to apply
Expressions can be applied to every property you could animate with keyframes.
To quickly add an expression go to the properties stopwatch icon and option + click on it.
You can then directly write your first expression.
gif from motion design school Expressions = Calculation
Every Expression is a little (or big) calculation that has to have a result at the end. This result is then returned to the property it was applied to.
So for example if you put in the following into the rotation property
100+30the rotation will be set to 130°.
The expression result must, without any exceptions, be a value that the property can read. Otherwise see the part about Expression errors.
Some properties need one value (rotation, opacity), some two (position, scale,..) and some even three (3D-position,…) or four (color). In these cases we need to use [] to return the the correct values to the property.
[ ]
To output calculation results you can use [ ]. If the property has a single value you do not need it, but if you have more than one value you need to use a so called array:
[value] or value

[value1, value2]
[value1, value2, value3]
[value1, value2, value3, value4]
Example
[200 + 200 , 10 * 300]Applied to the position property this will set it to x = 400 and y = 300.
// and ;
If you want to add comments to your code, that only you can read and AE does not you need to add a // in front of it.
Also let’s put a semicolon ; at the end of every line of code. This will tell AE that the line is ended. You don’t necessarily need it at the last line or if there’s only one line of code.
// this is a comment
// you'll need mark every line of comment with these

300 * 2;  // you can also write a comment after a line of code
Variables
In Expressions you can define variables. This makes calculating and reading your code a lot easier.
Example
Let’s try this in the position property:
offset = 300;         // "offset" created and set to 300
x = 200 + offset;     // "x" created, set to 200 and offset added = 500
y = offset;           // "y" created and set to offset = 300
[x,y]                 // x and y returend as final values
The position will be set to 500, 300
Arrays
An array is a collection of one or more values. Its needed for example to deffine the position of an element like [20,10] or the color [0.3,0.4,0.4,0.1].
An array can also be a collection of things like in this example
myfavouritefruit = ["apple", "pear", "berry", "melon"]Getting one of those values is done by adding [n] after the array name. n being the number of the array element you want to reference starting with 0 for the first one.
myfavouritefruit[0]     // "apple"
myfavouritefruit[1]     // "pear"
myfavouritefruit[2]     // "berry"
myfavouritefruit[3]     // "melon"
In a lot of programming languages indexing is startet with 0. Why? Short answer: It makes calculations easier. For longer answers search the web for: “Why computers count from zero”.
Global Variables
These are variables that are defined by AE and that you can use to work with. The most useful ones are value and time
value
Sometimes we want to use the actual value of a property and just add our calculation to it. This is where we need the global variable value After Effects provides for us.
Value represents a number or array of the property at the current time
For single value properties like rotation or opacity writing value will give you that number.
value - 20 // If added to the opacity it will fade the layer 20%value + 120 // If add. to the rotation will add 120° to the current rot.For properties with more than one value that are stored as array, we’ll need to reference which array value we need.
So for example if a layers 3D-position is 300,200,420 and you want to add 20 in every direction you can do this like so:
x = value[0] + 20; // 300 + 20
y = value[1] + 20; // 200 + 20
z = value[2] + 20; // 420 + 20
[x,y,z]
time
The global variable time gives you the value of the current playtime in seconds.
Use this for everything that you want to steadily animate over time.
Example
If you put this in the rotation property it will rotate the element 100° every second.
time * 100This will rotate the element at half the speed. 360° will be done in 2 second.
time * 360 / 2
Loop Expressions
A Loop is a structure, series, or process, the end of which is connected to the beginning.
You can loop one particular movement or a whole sequence consisting of multiple animations.
In AE you can manually create loops by duplicating keyframes where the last keyframe should always match the first one.
Or you can add expressions to the property you want to loop.
Basic Loop
Repeat keyframes after the last keyframe
loopOut();Repeat keyframes before the first keyframe
loopIn();Different Kinds of Loops
You can also define the kind of loop.
- “cycle” – simple repetition of keyframes (default)
- “pingpong” – back and forth repetition
- “offset” – adds the value of the keyframes to each repetition as offset
- “continue” – continues the speed/value of the last keyframe
Here is an example. Notice how you can also add a set repetition amount
loopOut("pingpong",2);Continuous Loop Trick
If you want to loop all keyframes before and after simply write:
loopIn()+loopOut()-value;you can combine this with loop kinds as well:
loopIn("pingpong")+loopOut("pingpong")-value;Math.sin() and Math.cos()
With these two you can create motion that hovers between values.

The formula for letting variable values hover with Math.sin between -1 and 1 is:
Math.sin(time)This lets the value go from 0 to 1 to -1 to 0 in 2*π seconds (see the graphic above).
To let the value hover in clean seconds we need to multiply time with π. Like so:
Math.sin(time * Math.PI);This will hover the value between 0 to 1 to 0 in 1 to -1 to 0 every 2 seconds.
Now we can add a multiplier for the frequency and amplitude:
Math.sin(time * Math.PI * frequency) * amplitude;Math.sin(time * Math.PI * 0,5); // Half the speed (every 4 sec.) Math.sin(time * Math.PI * 2); // Speeds up to double speed (Every sec.)Math.sin(time * Math.PI) * 100; // Hovers between 100 and -100; Math.sin(time * Math.PI) * 56; // Hovers between 56 and -56;Also sometimes you might want to add an offset like so:
Math.sin(time * Math.PI * frequency) * amplitude + offset;Math.sin(time * Math.PI * 2) * 5 + 100; // Hovers between 105 and 95; Math.sin(time * Math.PI * 2) * 50 + 50; // Hovers between 0 and 100;Example
Put this into the opacity property of an element to let it fade over 4 seconds between 100 and 0 opacity:
Math.sin(time * Math.PI * 0.5) * 50 + 50If you use this in the scale property it will scale back and forth between 50% and 100% every second:
s = Math.sin(time * Math.PI * 2) * 25 + 75;
[s,s]
Conditional statements: if, else, else if
if (condition) { // block of code to be executed if the condition is true }if (condition) { // block of code to be executed if the condition is true } else { // block of code to be executed if the condition is false }if (condition1) { // block of code to be executed if the condition is true } else if (condition2){ // block of code to be executed if condition1 is false but condition2 is true } else if (condition...){ // block of code to be executed if all conditions before are false but condition... is true } else { // block of code to be executed if all before conditions are false }How to write comparisons for conditions
a == b a is equal to b a != b a is not b a > b a is more than b a >= b a is more than or equal to b a < b a is less than b a <= b a is less than or equal to bExample
if (cats > 10){
  answer = "You have more than 10 cats";
} else if (cats >= 5) {
  answer = "You have between 5 and 10 cats";
} else {
  answer = "You have less than 5 cats";
}
Math.round() – Math.floor() – Math.ceil()
Math.round(0.9); // result: 1 Math.round(134.2); // result: 134 Math.round(10.5); // result: 11Math.floor(0.9); // result: 0 Math.ceil(134.2); // result: 135Example
wiggle = wiggle(1,200); t = Math.round(wiggle/100); t = t * 100; [t]Shorter version:
t = 100*(Math.round(wiggle(1,200)/100));
[t]
wiggle()
Example
x = wiggle(2, 100)[0]; y = value[1]; [x,y]wiggle = wiggle(2,100); t = 100*(Math.round((100-wiggle)/100)); [t]random()
random()         //generates a random value between 0 and 1
random(max) //generates a random number between 0 and a maximum value
random(min,max). //random number between min and max value
Example
random(200) //random number between 0 and 200 random(20,50). //random number between 20 and 50Use an expression to generate values for an effect
Example:
Create an Echo effect and then position the echoed elements on a circle. Put this into the “Echo Time” property

More Expressions