Image management and Raw conversion
The script for Praxismodul 4 is intended exclusively for use in class at the University of Applied Arts and should serve as a reference for all course participants. It is not allowed to pass it on to others.
Welcome to the Praxismodul on image management and raw conversion!
In Praxismodul 4, subtitled ‘From Photo to Image’, we will familiarize ourselves with various concepts of image management and learn the basics of Raw conversion. This will be helped by a detailed tour of the Lightroom, Bridge and Camera Raw programs. We will prepare images for output and lastly highlight the interaction with Photoshop.
Introduction
Where does this mass of images we consume come from?
The originators of the volume of images are no longer just the professional photographers who act on commission or the amateur photographers who fill a family album with their snapshots. With digital photography and new media, the number of image producers and thus the mass of images has increased immeasurably.
How does the amateur photographer keep track of the thousands of pictures she has taken and the tens of thousands more she will take?
How to sift and select, archive and retrieve the photos, the professional photographer wonders, given the terrabytes of data she has already produced and the tens of terrabytes she will produce?
Image management
Once the photo archive has reached critical mass, the images it contains seem to get lost in the sheer volume. Beyond manageability, the images will disappear.
Against this background, image management gains enormous importance. Only the right access to the archive allows retrieval and ensures usability.
There is no lack of helpful tools. However, away from professional operations, the number of users of image management software is still far from meeting actual needs.
Workflows
Image management is one of those annoying and rather complex tasks for which, however, solutions must be found. Everything initially revolves around access.
In fact, we have to talk about many different accesses, which in turn are assigned to different workflows. A hobby photographer will manage her images differently than a professional photographer, a press photographer differently than a studio photographer, a fashion photographer differently than the employee of an image data service, a professional image editor differently than a photo artist, a graphic designer differently than an Instagram user.
This list of different approaches could be extended indefinitely.
The question: “Which image management software is best suited for my requirements?” is therefore not only at the beginning of dealing with one’s own image volume, but logically also at the beginning of our workshop.
Derived from what kind of image producer you are or would like to be, a basic decision is required from us here in a certain way.
To help you make this choice, if you haven’t already made it, I will outline five typical workflows and assign the corresponding solutions.
After that, we’ll take a closer look at three image management tools used in semi-professional and professional workflows: Lightroom, Lightroom Classic, and Adobe Bridge.
Casual Photographers

Let’s start with by far the largest group, which I’ll call casual photographers. This type includes all people who use a digital compact camera or the camera of a smartphone to take private pictures.
We could still make various distinctions within this group. There are people who only take photos for specific occasions, those who prefer to produce snapshots, and those who share everyday documents on Instagram. Some are content with creating low-end JPEGs, while others want to use their camera’s capabilities on a case-by-case basis and create high-quality data from time to time.
What they all have in common is that they want to produce, collect, store and retrieve images.
The simplest and still widely used way to do that is to transfer the photos from the camera to a hard drive and store them there, ordered or unordered, in a directory.
10,000 photos are taken faster than you think. Even for casual photographers, the amount of images will eventually become a problem if they don’t use an image management tool.
There is a wide range of image management software. Let’s take Apple’s Photos app as a representative example for the private user sector.
> Open the Photos app.
The Photos app lets you manage different types of media, find people and places, create albums, do simple image editing, and get projects like greeting cards, photo books, etc. off the ground.
Photo apps like these cover all the needs for casual photographers and are, in my opinion, indispensable for home users. I myself use the Apple Photos app for my private shots.
The parameters for decision making are …
- Low to medium data volume: 5,000 to 50,000 photos. iCloud users get 5GB of free storage. 50GB currently costs 99 CENT per month at Apple, 200GB cloud storage currently costs 2.99 EURO per month.
- Image file formats: In principle, all relevant image file formats from digital cameras from simple JPEG to high-quality HEIF (High Efficiency Image File Format) can be imported. However, the private user app is not recommended for a professional Raw workflow.
- Original data in the cloud or on local data media: The advantage of the cloud is of course that the images can be viewed, edited and output from any of the connected devices. However, you have to accept that the originals are stored in the USA on a server from Amazon or Microsoft.
- Image editing in the app: The in-app image editing options are kept simple and intuitive to use. So-called photo enhancements can be done quickly. For HiEnd image editing, you then have to reach for a professional tool like Photoshop or Affinity Photo, of course.
- The output options include:
– exporting as JPEG, TIFF or PNG,
– sharing via Mail, Messages, etc.,
– publishing via Whatsapp and Co,
– as well as creating a slideshow.
Amateur photographers mobile
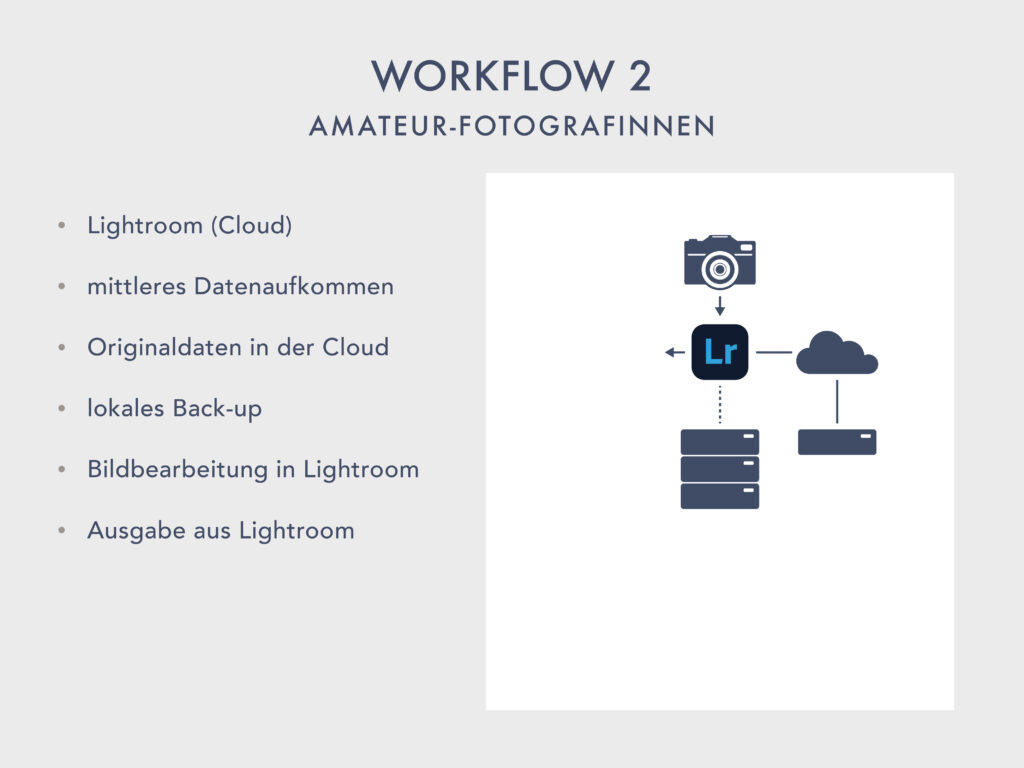
More ambitious photographers who use the medium semi-professionally, at least not professionally, I call amateur photographers. They own at least a digital SLR camera and various photo equipment. They are always on the hunt for the perfect photo and put a certain amount of effort into it.
Amateur photographers not only have to deal with a higher volume of data. They have to think explicitly about data management and data backup. They also tend to have higher demands on image editing capabilities than casual photographers.
The Lightroom cloud workflow launched by Adobe in 2018 is a viable solution for most of these needs.
Right off the bat, we need to make an important clarification here: Adobe Lightroom is not just a cloud solution of the familiar, classic Lightroom desktop application. Adobe Lightroom offers cloud-based features not found in the desktop version.
The cloud version of Lightroom and the desktop version – now referred to by Adobe as Lightroom classic – are being developed in parallel.
Adobe Lightroom classic is the pro version that is appreciated and used by many professional photographers.
The cloud version, Adobe Lightroom, is also a high-end tool, but it is more tailored to ambitious amateur photographers and a very specific professional workflow.
We’ll take a closer look at that later.
The parameters for making a decision are …
- Medium data volume: The data imported from the camera is stored directly in Adobe Creative Cloud. The Lightroom subscription includes Lightroom and Lightroom Classic plus 1 TB of cloud storage and currently costs just under 15 euros per month. The combined subscription with Photoshop costs just under 25 euros.
Amateur photographers often produce high-quality image data in the form of RAW files. About 20,000 RAW files can fit on 1TB of storage. Adobe allows for a maximum storage expansion of up to 10TB (approx. 200,000 photos).
If you use the cloud storage only for your current photos—say, those taken over the last two years—and store older photos in a local archive on an external hard drive, 1TB of cloud storage should be sufficient for an amateur photographer. - Original data in the cloud: The security of the data in the Creative Cloud is the same as that of iCloud. Adobe’s Creative Cloud also uses Amazon Web Services (AWS) as a data service.
- Local backup: Local backup is recommended with any cloud solution. Important: The backup is not identical to the archive. Only the data currently in the cloud is mirrored in the local back-up. The archive is outsourced and should have its own back-up to achieve maximum data security.
- Image file formats: Lightroom imports and manages all relevant image file formats from digital cameras. The app can also handle Apple’s HEIF files, DNGs and Photoshop files (but not PSBs). In addition, Lightroom offers a high-quality Raw workflow.
- Image editing in Lightroom: The in-app image editing capabilities allow for much more than mere image enhancements. Since they conform to the Camera Raw standard, they are hardly inferior to Lightroom Classic.
- Output options include:
– exporting as JPEG, TIFF or DNG,
– sharing via Mail, Messages, Instagram, Whatsapp and Co,
– creating slideshows,
– uploading to Adobe Portfolio and similar web services.
Professional photographers mobile
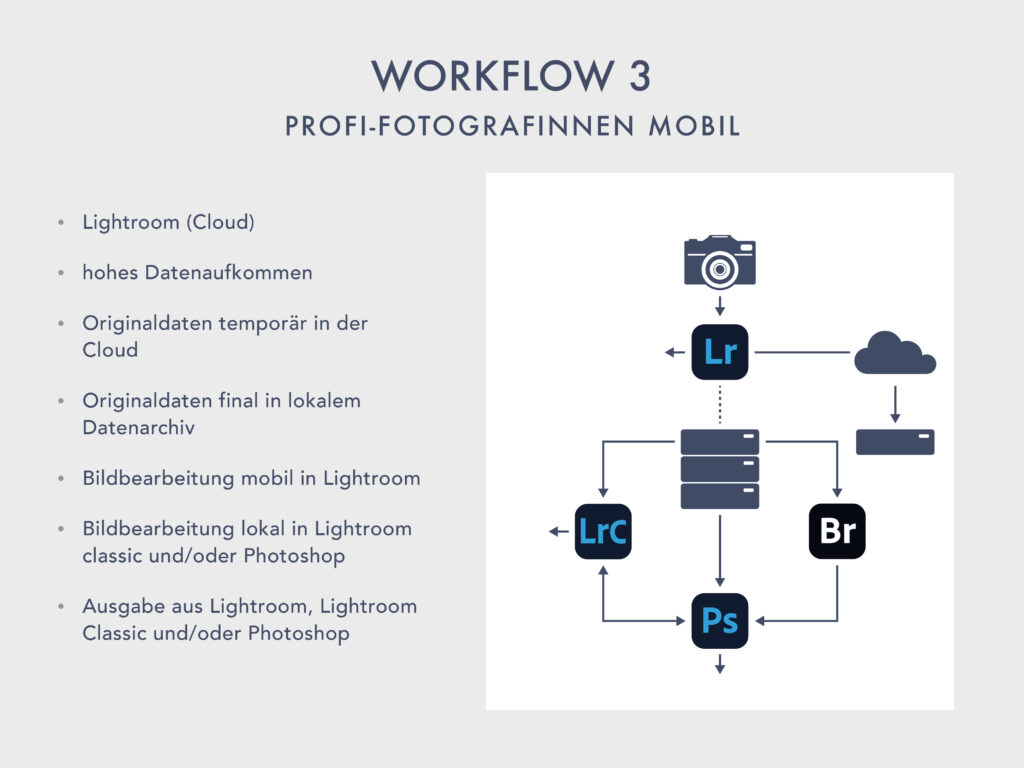
Given the parameters just outlined, the question arises as to what extent the new Adobe Lightroom is also suitable for professional photographers.
The question can be answered by considering a specific photo workflow in which Lightroom cloud offers certain advantages over Lightroom classic. The advantage of the cloud solution lies solely in the ubiquity of access. Because in terms of data handling and file handling, flexibility in storage management, export functions, etc., Lightroom classic is clearly better.
Photographers who travel a lot, such as press or event photographers, appreciate the mobile availability of their current image data via the cloud. You don’t have to go to a computer to search through the image database, quickly edit images and send the desired photo to a photo editor. If necessary, you can do this in the Lightroom app on your laptop or smartphone.
The integration of all devices on which Lightroom can be installed – from the smartphone to the tablet to the laptop or the classic desktop computer – with the Creative Cloud service as the central data storage, is a strong argument for professional photographers to take up Adobe Lightroom, even if they are already users of Lightroom classic.
In fact, the professional photographer is not making an either/or decision between Lightroom and Lightroom classic. She probably relies on Lightroom classic first and foremost, but where appropriate, she also uses the cloud version.
The parameters for making the decision are …
- High volume of data: Even professional photographers might settle for 1 to 2TB of cloud storage. There is no need to upgrade to 10TB in this workflow. The cloud storage only ever contains the current image data, i.e. those that were perhaps created in the last six months.
- Original data temporarily in the cloud: The cloud ensures access to my original image data at any time and on any of my devices.
- Original data finally in local data archive: Older data is removed from the cloud after a job is completed and stored in a local data archive.
- Mobile image editing in Lightroom: Minor image editing tasks that need to be performed quickly are done directly in Lightroom – sometimes even on a smartphone or tablet.
- Image editing locally in Lightroom classic or Photoshop: Professional image editing steps are prepared in Lightroom classic and performed in Photoshop.
- Output from Lightroom, Lightroom classic or Photoshop: With Lightroom, Lightroom classic and Photoshop we have three programs that allow us to output professional image data. The output options of Lightroom are a bit limited. Lightroom classic is much better equipped and Photoshop is the non-plus-ultra for the preparation and output of image data anyway.
Professional photographers

Lightroom Classic is the first choice for professional photographers. Of course, there are prominent competitors like Capture One that score with similar qualities. More on this later.
Lightroom classic is an image management tool that organizes locally stored image data into catalog files. The desktop program is fast, scalable to any size, and offers HiEnd image editing capabilities.
I will discuss the advantages of Lightroom classic over Lightroom later, let’s first deal with a typical professional workflow.
The parameters for making a decision are …
- High volume of data: Lightroom classic users don’t have to worry about cloud storage limitations. When the local storage media threatens to become full, you simply add a new hard disk.
For orientation: an external 2TB hard drive with USB-C doesn’t cost 100 EURO anymore. - Original data in local data archive: Having the original data locally means that management and editing takes place on a desktop computer, such as a well-equipped laptop or a professional workstation if the photographer also wants to do HiEnd image editing with Photoshop.
- Image file formats: Lightroom classic can handle all the pertinent image file formats. JPEGs, PNGs, TIFFs, PSDs, HEIFs, DNGs and even PSBs are no problem.
Since Lightroom classic uses the Camera Raw standard, all new Raw formats coming on the market are immediately integrated into the conversion module. Lightroom classic is perfect for any HiEnd raw workflow. - Image editing locally in Lightroom classic or Photoshop: In a typical professional workflow, the photographer uses Lightroom classic to select, convert, and initially edit images. Complex image processing measures are only set in Photoshop. The interaction between the two programs works smoothly.
- Output from Lightroom Classic or Photoshop: Since many shots do not require any in-depth image processing at all, the photographer often pushes the processing in Lightroom until the output is ready. The desired file formats, bit depths and resolutions can be specified. If print output files are to be created, a switch to Photoshop is called for. However, this last step is often carried out by the recipient of the image files, the graphic designer.
Graphic designers and image editors
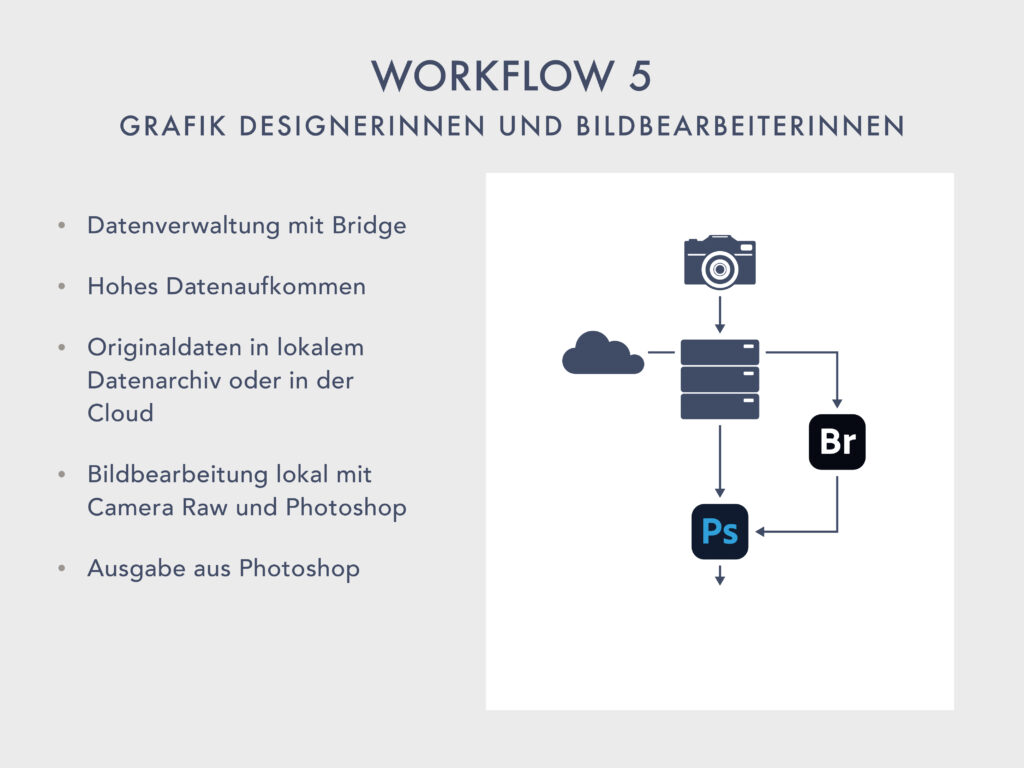
And this brings us to the fifth and last typical workflow, which I would like to briefly explain to you.
Professional graphic designers and image editors tend not to use image management software such as Photos, Lightroom, Lightroom classic, Capture One, etc. The reason for this lies in a peculiarity of typical graphic design or image editing workflows: Image data is usually not managed centrally here, but assigned to the individual jobs.
Images represent only a single aspect of graphic design. In addition, there are layouts, final layouts and final artwork created in Adobe InDesign or Illustrator, vector graphics such as logos and illustrations, fonts and much more. In an orderly, well-structured workflow, the graphic designer makes sure that all the files she needs are always gathered in a single job folder so that she can access them immediately at any time without having to start a complex data search first.
The image editor is quite similar. She, too, manages all the source files, montages, and output files she needs in a single job-specific folder. The archive is not centralized, but decentralized, possibly even customer-specific and time-structured.
Graphic designers and image editors therefore prefer a file browser rather than a pure image management tool.
To browse directories and find files, the Mac user uses the Finder. With Adobe Bridge, however, we have a much better-featured file browser that is perfectly tailored to the professional workflows of graphic design and image editing.
The parameters for making a decision are …
- High volume of data: Bridge uses the existing directory structure. It allows intelligent access to any amount of data.
- Original data in local data archive or in the cloud: The Bridge also does not differentiate between a local directory and the cloud. It searches any storage location.
- Image file formats: Bridge is suitable for searching all types of files. Images, graphics, videos, music, etc. – it makes no difference to the Bridge’s search function.
Raw conversion can be started directly in Bridge for corresponding files. Camera Raw is virtually connected. This is of course a basic requirement for professional image management. - Image processing locally in Photoshop: Raw conversion can be completed with the “Open Image” command. The converted image then opens in Photoshop as usual.
- Output from Photoshop: Bridge, like Lightroom classic, has its own output module. However, more than a few simple standard operations cannot be performed with it here either. The professional image preparation and creation of output files is therefore carried out entirely in Photoshop.
The five workflows presented here are representative of a large number of specific workflows in the fields of photography, graphic design and image processing. When deciding which workflow to use, it is important to analyze your own requirements and assess the scaling potential.
But it’s also important to get to grips with the relevant software solutions. You have to try out the programs in question to find out which one you want to work with.
To this end, in the Praxismodul we will take a closer look at working with Lightroom, Lightroom classic, Capture One and Adobe Bridge. We will focus more closely on Adobe Lightroom Classic than on the other programs mentioned. Since there is significant overlap between them, it makes sense, for the sake of clarity, to cover the key aspects of image management and RAW conversion together within a single application.
Adobe Lightroom Classic
> Launch Lightroom classic, show Library module.
Features
Lightroom classic is the desktop solution of Adobe’s popular image management tool.
For many professional photographers, Lightroom classic is the image management hub they use every day to capture all their photos and organize them into job-specific collections.
Lightroom classic provides structured access to the image archive, acts as a light table for image selection, and allows access to image metadata.
In Lightroom classic, photos are developed and basic image editing steps are taken.
A number of output modules are used to get the images on the desired path. An elaborate export function creates image files with specific parameters.
Before we can delve into these options in detail, we first need to import photos into Lightroom classic. For this, let’s first get our exercise files from base (ownCloud).
> Student folder “Surname-Praxismodul-4” within the semester folder create.
> Download and move the exercise data to the student folder.
> Unzip.
The photos that are in the “Shootings” folder are our originals. At this stage we don’t want to think about the different import functions and ways. We just want to get something to look at in Lightroom.
> Switch back to Lightroom.
I’ve already hinted at it, and we’ll take a closer look in a moment: Images imported into Lightroom Classic are listed in a catalog.
The current view of the Library module shows the contents of the current catalog. The name of the current catalog with the extension “.lrcat” can be read in the title bar of the Lightroom window.
We will now create a new catalog to use in our workshop.
Please do not misinterpret this procedure: We are only creating the new catalog so that we can all start from the same catalog state. After all, we don’t want to mess around with any content that other people have imported into their specific catalogs, but only and exclusively deal with our exercise images.
In practice, the number of different catalogs usually remains manageable.
> File/New Catalog…
In the dialog we go to our just created “Praxismodul-4”-folder in the student folder, create a new folder there with the title “Lightroom-Catalog” and save the new catalog there under the name „Lightroom-Catalog-PM4″.
> Go to “Praxismodul 4” folder.
> Create new folder “Lightroom Catalog”.
> Save new catalog as “Lightroom-Catalog-PM4”.
The creation of the new catalog results in a catalog change. This will cause Lightroom classic to restart. Once the program is active again, we check the catalog name in the title bar of the window and see that the catalog change was successful.
Lightroom classic allows you to put the catalog file anywhere you want. And that’s a good thing. Because the internal drive of the desktop workstation or laptop has only a limited capacity.
The ambitious amateur photographer might make do with the internal storage capacity, i.e. store her photos in the Picture folder and use the default catalog file.
Professional photographers, however, produce vast amounts of images that will not all fit there and therefore need to be swapped out to additional hard drives.
Regarding the procedure for swapping out the catalog file, here is an important basic rule and a strong recommendation: The specific Lightroom classic catalog should always be located on the same volume as the images managed in the catalog. This ensures that the link between the catalog entries and the original files, i.e. the Raw files, is always upright and cannot be lost.
We’ll look at the Lightroom catalog in more detail, but for now let’s continue with the import process.
The image display area of the Library is empty. We haven’t imported any images yet. Let’s do that now.
Import from hard disk
As soon as we click the Import button, the import window opens.
> Click the Import button.
A warning may now appear informing us that access to data may be restricted under macOS. This has to do with the security structure of the operating system. However, we do not let this irritate us and give OK for the time being.
> Close the warning message with OK.
The Import window contains all the choices and settings for importing images into Lightroom Classic.
In the Source panel we specify an import source.
- This can be a digital camera – more precisely its memory card.
- But it can also be, as in our case, any directory on a hard drive where my photos are located.
We have two ways to target our “Shootings” folder.
Option 1:
> Click the arrow icon(!) of the Macintosh HD button in the Source panel.
> Users etc.
Expanding the entries of the source panel brings up the directory structure.
We could follow this path consistently now and go to our “Shootings” folder, but we want to take a slightly more convenient route.
Option 2:
> Press Select a source bar.
The menu shows a short list of preferred source locations.
If we choose Other Source… we can browse the hard disk in the usual way and locate our destination folder.
> Click Other Source…
> Go to “Shootings” folder.
In case there is no data displayed in the destination folder, we remember the warning we received before. In order to access the data, we need to grant permission in the macOS privacy settings.
> Select Apple menu / System Preferences / Privacy and Security / Files and Folders.
> Open Adobe Lightroom Classic menu and activate all existing sliders.
> Restart Adobe Lightroom Classic.
> Click the Import button again.
> Go to “Shootings” folder.
> Choose.
Once we have specified the source folder, all the images found in the source folder and its subfolders will appear on the light table of the import window.
Now it’s time to select the desired images for import. Currently all photos are selected for import. With the Uncheck All button the selection can be deactivated.
> Press Uncheck All button.
We want to import only the four photos with the building in a first step.
> Add the building photos to the selection individually by activating the checkboxes.
To be able to judge the image contents better, it is sometimes helpful to enlarge the thumbnails.
> Enlarge thumbnails a bit.
… or switch from Grid View to Loupe View.
> Activate first building photo and press Loupe View button (E).
Did you notice the short delay when loading the image when switching to Loupe View? The delay indicates that Lightroom is working with different previews in Grid View than in Loupe View.
Previews
This leads us to an important statement right at the beginning of our discussion of Lightroom classic, one that needs to be stated clearly and cannot be emphasized enough:
Lightroom classic doesn’t actually import the original files, but merely creates previews from the Raw files, i.e. thumbnails, which are then used to work with. In fact, the original photos remain untouched and stay on the hard disk forever as they were downloaded from the camera.
That is, no matter what I do with my images in Lightroom classic, any action I take on the images here will not be applied to the original Raw files, but to the previews created by Lightroom.
Now there are different types of previews and we can determine during the import process what type of previews Lightroom Classic should use or produce.
File Handling:
In the File Handling panel of the Import window, we can make the main settings for this.
Let’s take a closer look at the Build Previews menu.
> Expand Build Previews.
Lightroom classic uses three different types of previews in parallel and in different working contexts.
- Minimal previews or embedded & sidecar previews are used as long as not all standard previews are rendered yet.
- Standard previews are used in all filmstrip and grid views. They are of better quality than the minimal previews and much easier to handle than the very large 1:1 previews.
- 1:1 previews are always used when it comes to the nitty-gritty, so to speak, when a close look is required during developing or image processing.
Personally, I usually choose the “Minimal” entry of the Build Preview menu when importing.
- This keeps the preview cache file small.
- Lightroom gradually creates the standard previews all by itself after the import is complete. I don’t have to worry about it at all.
- 1:1 previews are only rendered when I take a closer look at an image, e.g. when I switch to the Loupe View. I don’t have to take care of that either.
There are certainly workflows for which a different choice can be made. However, you can’t go wrong with our approach. And we take care of reasonable memory management and speed up the import.
Let’s switch back to the Grid View.
> Grid View (G) via keyboard shortcut.
Smart Previews
If the Build Smart Previews checkbox is activated in the File Handling panel, Lightroom renders so-called Smart Previews. These are image previews that allow you to edit images even if the original files are not currently accessible.
That is, if the external hard drive that contains my original Raw files is not currently connected and I still want to edit the image in Lightroom. Normal previews then refuse to edit, saying that the original file is missing. Not so when you have created a Smart Preview.
All the editing steps that I apply to the Smart Preview image by proxy are saved temporarily, so to speak, and as soon as the hard disk is reconnected, they are automatically transferred to the original preview.
Smart previews don’t have to be created right away when importing either. This can be done manually later in the Library module.
Other import options
- Don’t Import Suspected Duplicates ensures that already imported files are not imported again.
- Don’t Import Rejected Images prevents images that were rejected during AI-assisted culling using the Assisted Culling feature from being imported.
- Add to Collection allows you to assign images to a specific collection during import. We will deal with collections in detail later. For now, we will leave it aside.
- In the Apply During Import panel, we can apply development presets, metadata templates, and keywords to the images as we import them. In order to not let our first import process get out of hand now, we will also ignore these important functions for now.
Why do we deal so intensively with the import functions?
Because importing already sets the course for file handling, file management and all subsequent application possibilities.
There is one last aspect we need to look at.
The Add menu in the dialog header contains four options that allow you to specify what should happen to the original files.
Copy as DNG:
> Enable Copy as DNG.
- The photos are imported into Lightroom.
- Lightroom creates copies of the original files in the folder defined in the Destination panel …
- and converts all Camera Raw files to DNG (Digital Negative) format.
Not my choice. The DNG format is still somewhat suspect to me.
Copy:
> Enable Copy.
- The photos are imported into Lightroom.
- Lightroom creates copies of the original files and all associated files in the folder specified in the Destination panel.
- In addition, the original files remain in their original location.
Move:
> Enable Move.
- The photos are imported into Lightroom.
- The original files and all associated files are moved to the folder specified in the Destination panel.
- The original files are deleted from the original location.
If you select one of the options listed—Copy as DNG, Copy, or Move—you can rename the files in the File Renaming Panel during the import process.
Like the Add option, the Move option is only available for files that are already on a hard drive—that is, files that are to be imported from there and/or moved to a directory.
Add:
> Activate Add.
- The photos are imported into Lightroom.
- However, the original files are left in their location.
If the original files have already found their final place on a hard drive, the Add option will be our preferred choice.
> Press Import button.
Once we’ve pressed the Import button, Lightroom classic will start importing images, actually: rendering previews. Again, in Lightroom you only ever import and edit proxy files. The originals remain completely untouched.
The imported images are displayed in the image display area of the Library module.
Now let’s get some more images.
> Import / Select a source: / Recent: select the last used path.
The images we have already imported are grayed out, the ones we have not yet imported appear normal and are checked.
> Check for Add and press Import button.
The newly imported photos are displayed in the Library. But not the four previously imported images. A look at the Catalog panel of the left Library panel shows the reason for this: The view shows only the most recently added photos.
If we want to display all photos of the catalog we have to switch from “Previous Import” to “All Photographs”.
> Activate All Photographs display.
Import from the camera
The specific import process that dominates the photographer’s practice is, of course, importing images directly from the camera or from a card reader. We cannot now recreate the situation in the workshop at the individual workstations. So please sit back, relax, and just watch. I will show you the essentials of importing from the camera using an SD card as the source.
I’ll make a USB connection between the camera or just between the card reader and the laptop.
> Connect the card reader to the USB port.
If you want Lightroom to automatically detect the camera or card reader in the import dialog, check the “Show import dialog when a memory card is detected” box in the general preferences.
> Lightroom Classic / Settings / General: Show import dialog when a memory card is detected – and cancel.
If the import process does not start automatically, we press the import button as usual to start the import process.
> Insert SD card: The import dialog starts automatically.
The SD card is recognized as source and displayed. The minimal previews of the photos on the card appear on the light table and are ready for selection.
- The small checkbox called “Eject after import” is self-explanatory and a good option.
- Lightroom creates copies of the original photos as part of the import process and saves them to a pre-determined destination folder on your hard drive.
- Lightroom does not change the state or contents of the SD card. If you want to delete the photos, you can do this in the Finder or directly in the camera after the import.
All of the import functions that we have already learned about are also available when importing from the SD card. We do not need to discuss them again in this context.
> Cancel import.
> Switch to the Finder. Eject card.
Tethering
Some photographers like to use the tether feature of Lightroom classic when shooting in the studio. This establishes a direct connection between the camera and Lightroom. The photos are imported virtually live and displayed on the screen of a laptop, for example.
The convenient thing about it:
- The photographer uses Lightroom’s Tether capture bar instead of the camera interface to make the most important camera settings and trigger the shutter.
- The images can be reviewed immediately on the laptop’s large display. This is especially appreciated by the clients present at the shoot or the art director, who is in charge of photo supervision.
- Numerous parameters can be defined for the shooting session, such as the assignment to collections, the naming of the photos, the definition of the storage location, etc.
Tethering is started in the Tethered Capture menu of the File menu.
> Open File / Tethered Capture.
> Cancel.
Skillfully set up and applied tethering speeds up and simplifies the photo workflow immensely.
The list of cameras that support tethering in Lightroom classic is growing all the time, but it is still far from being complete.
Modules
The Lightroom user interface offers a separate module for each of the different requirements of the photo workflow.
Managing and organizing photos is done in the Library.
> Activate the Develop module.
To edit the photos, switch to the Develop module.
> Activate Map module.
In the Map module you can view and manage the locations where the photos were taken.
> Activate Book module.
In the Book module you can create photo books and have them produced by the provider Blurb or output them as PDF.
> Activate Slideshow module.
With the Slideshow module you can generate slideshows – with self-designed titles and backgrounds.
> Activate Print module.
The Print module offers various templates and design options for quick output to your own printer. HiEnd-Print output will not be done with this module for many reasons.
> Activate Web-Module.
With the Web module you can create and publish web galleries. The Web module is especially popular with event photographers. In fact, web galleries can be useful in many photo workflows. For example, when the photographer wants to quickly send a photo overview to the art director, when one wants to publish making-of photos, or the photos from the last vacation, etc.
In our workshop we will deal exclusively with the two main modules – the Library and the Develop module. Because the tasks of these two modules are: Image Management and Raw Conversion.
The discussion of all other modules and possibilities of Lightroom classic must be reserved for a separate Lightroom workshop.
> Switch back to the Library.
Library
You may have noticed that the panel scheme is the same in all modules:
- There is always a large image display area in the center, …
- to the left and right of it there is a side panel with different control panels, …
- directly below the image display area we have access to the toolbar, …
- the so-called filmstrip extends over the entire lower window area.
If you don’t see the same panels as I do, you can fix this in the Window menu.
> Open Window / Panels menu.
Filmstrip
- The filmstrip appears unchanged in all module views.
- It shows the photos of the currently selected folder or collection, it shows filter results or the results of the keyword search.
- Thus, the Filmstrip always provides an overview of the material you intend to organize or edit.
Currently, the Filmstrip contains all the photos in our Lightroom catalog. This is confirmed by a glance at the catalog panel on the left side panel. And this can also be seen from the “All Photographs” entry above the filmstrip.
> Click on “All Photographs” of the filmstrip.
Behind the Source entry of the filmstrip there is a small pop-up menu that allows you to quickly select another source for the display.
> Activate Bsp1 in the filmstrip.
If you activate a photo in the filmstrip, it will also be activated in the large image display area of the library, the light table.
You can navigate in the filmstrip by pressing the Right or Left key on the keyboard.
> Press the right or left key.
The two arrow buttons at the top of the filmstrip have a different function. They are used to navigate through the workflow steps that have been performed so far.
Loupe View
We do the switching between Grid View and Loupe View by pressing the corresponding buttons of the toolbar or by using the corresponding keyboard shortcuts.
> Press the E key, press the G key and press the E key again.
Once we are in the Loupe View, the real purpose of the filmstrip reveals itself. The filmstrip allows you to keep track of all the relevant photos, even if you only have a single image in view on the light table.
Since we are in the Loupe View, let’s explore the zoom functions right away.
The cursor turned into a plus loupe as soon as it is moved over the image. Clicking on the image causes it to zoom in.
> Zoom click into the image.
The current view size can be seen in the top panel of the left side panel. Even when minimized, the Navigator tells us the current zoom level: 1:1.
If there was no 1:1 preview for this photo so far, we have just made Lightroom generate one by choosing the 1:1 view size.
> Zoom click into the image again.
Clicking again resets the view to the original view size. In the Navigator bar, the entry “FIT” is now highlighted. The image appears fitted into the window and is not cropped anywhere.
Repeated pressing of the space bar switches between the current and the last zoom level.
> Press the space bar several times.
Let’s click into the image again with the loupe. But this time we hold down the mouse button.
> Zoom-click on the head of the model and hold.
If we now release the mouse button again, Lightroom automatically returns to the last selected zoom level.
> Release the button.
> Zoom click on the cockpit of the helicopter and hold.
> Release the button.
Navigator
The Navigator bar offers a small selection of other typical zoom levels, which we don’t need to go through all now.
> Open the Navigator.
Currently the Navigator shows a thin white frame that contains the entire image.
Now let’s bring the photo to the appropriate view size by clicking the 1:1 entry of the Navigator bar.
> Clicking the 1:1 entry of the Navigator bar.
While a section of the image is displayed on the light table and can be examined, the entire image remains visible in the Navigator.
The white frame that now marks the detail section can be moved over the Navigator image to bring another image detail to view at high magnification on the light table.
> Move the frame in the Navigator.
> Finally, activate FIT again.
Let’s return to Grid View by pressing the G key.
> Press the G key and cancel photo selection.
Toolbar
The toolbar contains many more options, which of course we cannot look at all here. At least the most important of them I would like to mention briefly.
Sort:
> Expand Sort menu and finally collapse it again.
The Sort menu of the toolbar does not need to be explained specifically. Traditionally the sorting is done by capture time, but you can use different parameters for sorting. A clever sorting makes it easier to find photos with the preferred aspects in the Grid View.
Thumbnails:
> Enlarge thumbnails and reduce them again.
With the Thumbnails slider you can change the size of the thumbnails in the Grid View. Smaller thumbnails allow a better overview, larger ones a better grasp of image details and differences.
Toolbar menu:
> Expand toolbar menu (small down arrow on the far right).
In the toolbar menu you can activate additional tools in the toolbar.
Let’s now turn to the image display area of the Library in Grid View.
Grid View
The photographer makes use of the Grid View to handle some important tasks in the photo workflow. These include …
- bringing to view,
- organizing,
- flagging,
- rating and
- selecting the photos.
> Activate “Bsp1” and mouse over thumbnail.
The tool tips already provide us with some important information about the photo, namely file name, date, time and pixel dimensions.
If the expanded view is activated, even more important options are available directly in the cell.
All preferences for the cells are set in the View Options of the View menu.
> Open View / View Options.
> Disable and re-enable Show Grid Extras.
> Change from Expanded Cells to Compact Cells and back again.
> Close View Options.
In the header of the grid cell you can define four entries with different information about the photo.
> Click on the Copy Name or File Base Name.
If we click one of these zones – e.g. on the file name – an extensive menu opens, in which any information can be defined for the display.
> Click on CR2.
Directly below the File Base Name I display the “File Extension”.
btw: What does “CR2” tell me? The photo is a Raw file of Canon’s Camera Raw version 2. In many cases the camera manufacturer can already be identified by the file extension.
In fact, I think Lightroom Classic’s default display settings in the expanded cells view are perfectly usable:
- On the top left, the index number, i.e. the cell number of the grid.
- On the left below, the pixel dimensions of the photo. An important information with regard to the file size.
- On the right, as I said, the pure file name. This remains an important identification feature even within Lightroom.
- On the left, below it, the file extension.
As soon as the cursor is moved into a cell, the two rotation arrows appear in the footer area, with which the photo can be rotated clockwise or counterclockwise.
> Make 360° rotation.
And, of course, we can do rating and flagging in the expanded view.
Flagging and rating
Let’s start by giving some rating stars.
> Three stars for Bsp1.
> Four stars for Bsp3.
> Four stars for Bsp4.
On the left above the thumbnail you will see the flag icon to mark the photo.
> Mark Bsp4.
To make ratings and flaggings in the Grid View, the photo does not have to be activated, mouse over is sufficient.
Library Filter
Let’s see how we can bring photos to view or remove them from the light table by applying a filter.
Currently the light table shows all photos that are in my catalog. The Library Filter is set to “None”. We can search for attributes in the Library Filter. However, this requires that we have set attributes beforehand, i.e. that we have assigned the desired labels to the individual photos. And we have.
> Library Filter: Activate attributes.
If we only want to display photos on the lightbox whose rating is equal to or higher than 3 stars, we click the three stars in the Library filter and so on.
> Press the three stars button.
> Press the four stars button.
We can further refine the selection by displaying only flagged photos, etc.
> Press Flagged Only button (first flag button).
The current filter will be deactivated by clicking the button again.
> Press Flagged Only button again.
> Press the One Star button and press it again.
We won’t delve further into the subtleties of filtering now. I just want to mention that you can of course also filter by metadata.
> Library Filter: Show Metadata and hide it again.
The filter settings can also be locked, so that they can be applied to other collections and folders. We do this by clicking on the small Lock icon in the upper right corner.
> Library Filter: Lock and unlock filters.
Finally, let’s turn off all filters again, so that they don’t hinder us as we move forward in the workshop.
> Library Filter: Activate None.
I think it’s already clear at this point how important the various filter options are in Lightroom: Only filtering according to certain criteria makes it possible to find photos in the mass of material.
Catalog
In addition to the Navigator, the left side panel contains the Catalog, Folders and Collections panels for organizing our photos.
Let’s take a step back, so to speak, and briefly revisit the Catalog.
Data Structure

To clarify: the catalog does not contain our original files, but it is a database in which a corresponding record with three key informations is stored and managed for each photo.
- The reference to the location of the original on the hard disk.
- The status of the photo’s editing.
- The metadata of the photo, consisting of the camera and shooting data, added ratings and keywords, and more.
Working in Lightroom is non-destructive throughout. Any changes made to photos in Lightroom can be undone at any time. The original files remain intact.
Even during the output process, Lightroom classic never modifies the original files. When a photo is output, the modifications made are always applied to a copy of the original data. And it is this copy that is then printed or uploaded to a web gallery directly from Lightroom.
There is basically no limit to the capacity of a catalog. The most convenient state would be that there is only one catalog, and that it is located in the images folder on the workstation’s internal hard drive. This state can be maintained only as long as the amount of photos and edits does not exceed the hard disk capacity. Once the critical point is reached, the data must be outsourced.
Important: When outsourcing, you should always move files and catalogs using the corresponding export functions in Lightroom, never by moving or copying the data in the Finder!
To avoid this sometimes tedious process, many professional photographers choose to move their catalog to an external hard drive right from the start. This has two key advantages:
- When the maximum capacity of an external hard drive is reached, you create a second catalog on a new external hard drive, a third catalog on a third hard drive, and so on. The capacity thus theoretically extends to infinity.
- The external hard disk is mobile, i.e. it can be connected to any workstation and used there by Lightroom.
Folders
The Folders panel of the left side panel of the Library reflects the directory structure of a drive.
All external hard drives that you’ve ever linked to Lightroom are displayed in the Folder panel in bar form. The drive bar remains visible for reference even if the external hard drive is not currently connected to the computer. The bars of the hard drives that are currently not connected to the computer are marked with a small question mark, which should not worry us: As soon as the missing hard drive is reconnected, Lightroom automatically restores the link to the drive and the original files on it.
If you want to capture another folder and its contents, you can do so as usual via the Import dialog, or you can add a new folder and its contents directly in the Folders panel.
Like project folders in the Finder, folders in Lightroom allow you to collect or view related data in one place. Much like the directories and subdirectories on your drive, Lightroom folders and subfolders provide quick access to sections of the overall directory.
> Click Folders / Shootings.
> Click Folders / Maxi Fashion.
> Click Folders / Oldtimer Revue.
> Click Folders / Automesse Frankfurt.
Using folders makes it easier to find and manage images in Lightroom Classic. So from the beginning, you should make sure to set up a coherent directory structure on your drive, which will then be reflected in Lightroom. A bit of order can make the photographer’s life immensely easier.
I’d like to close this topic with an important note:
Folders in Lightroom are instances, not physical folders.
What may sound a bit complicated can be explained quickly, using the delete process.
> Right click Automesse Frankfurt-Folder / Remove…
The Remove dialog tells me that Lightroom will only remove the folder and its contents from the Lightroom catalog, not from the hard drive.
> Press Remove button.
However, some aspects of the physical directory can be modified using the Folders panel commands.
> Right-click Porsche Museum folder.
> Rename: “Vintage Cars” and Save.
In the context menu you can create physical subfolders or change the folder name and set a few other actions that will have real effects on the drive.
> Right click Vintage Cars-Folder.
> Show in Finder.
If a folder is deleted, moved or renamed in the Finder, Lightroom loses the link to that folder. The same is true for the rest of the images.
> In Finder, move “Bsp11” to the trash can.
> Switch back to Lightroom.
Lightroom still shows the preview, but it is worthless without the original and cannot be edited. The call sign in the upper right corner of the grid cell indicates this.
> Click on the call sign of the cell “Bsp11”.
> Cancel last.
Clicking on the call sign opens the possibility to search for the missing original. But since we have deleted the file and not just moved it, we will not find it.
This leads to the following recommendation: Folders and files that have been imported into Lightroom should only be deleted, moved or renamed in Lightroom and not in the Finder.
Following this advice is a convenient way to avoid having to deal with “disappeared” files and “lost” folders in Lightroom.
> Click All Photographs.
Catalogs and Folders represent the front end of image management. Collections, on the other hand, represent the output side of image management.
Let’s take a closer look.
Collections
The purpose of creating collections in Lightroom is to group photos based on various criteria in order to make them available for editing or to collect them for common output.
Let me illustrate this with a concrete example:
- In the attic of my grandmother’s house is a large box that contains all the family photo albums. The box corresponds to our Lightroom catalog.
- The individual photo albums inside correspond to our folders in the Folders panel.
- For her birthday, my sister wants a photo album that contains the photos from her wedding. This wish is the criteria for the collection.
I could now go and take all the desired wedding photos, which are spread over several albums, out of the albums and compile them into a new album for my sister. But that approach leaves ugly blank spaces in the beloved family albums.
However, creating a collection in Lightroom allows you to do just that, collecting the photos you want without removing them from their native folders.
Lightroom collections can contain photos from different folders and are created primarily with an eye toward how the photos will be used later.
The photographer might create collections for a particular photo style, or she might group all the photos she wants to sell to a stock photo agency. She puts together the most beautiful spring shots into a collection or gets an overview of usable night shots with a corresponding collection.
We want to use the latter as a criterion for the following exercise.
> Activate Maxx Fashion: Bsp4.
> Click Add menu of the Collections panel: Create Collection.
> Name: “Night shots”. Checked “Include selected photos” and press Create.
Now we add more photos to the newly created collection.
> Catalog / All Photopraphs.
> Select the two Graz night shots and drag them to the Night shots entry in the Collections panel.
As you can see, working with collections is as simple as it is effective.
In addition to the convenient structuring option, creating collections has another big advantage: Collections can be accessed not only in the Library, but also in all other modules.
> Catalog / All Photopraphs; deselect all images.
Lightroom marks the thumbnails of photos that are part of a collection with a Collection icon in the lower right corner. Clicking on this icon reveals which collections the photo is part of and provides a quick way to locate the intentional collection.
> Click Bsp4 collection icon / Night shots.
> Catalog / All Photopraphs; deselect all images.
Quick Collection:
I’m sure you’ve noticed the Quick Selection entry in the Catalog panel.
You use the Quick Selection function to quickly create a pre-selection when viewing photos. A click on the Quick Selection spot of a thumbnail adds the photo to the Quick Collection.
> Click Quick Selection spot Bsp6 and Bsp8.
This way you can go through the whole catalog or different folders and add the photos you find suitable to the basket for example to add them later to a real collection.
> Catalog Panel / Activate Quick Selection.
> Right click Quick Selection entry.
> Save Quick Collection “Stadt Graz Ausarbeitung”; “Clear Quick Collection After Saving” checked.
We could look at many more features of collections, but let’s leave it at this point.
> Catalog / All Photopraphs; deselect all images.
Stacking
We will also learn the basics of stacking, i.e. grouping similar photos in stacks, in the Praxismodul.
A very useful shooting technique is to take continuous shots when shooting. This can be done semi-automatically by using the appropriate camera function, useful for example when shooting moving subjects. However, continuous shooting is also often done manually, for example in the form of exposure bracketing.
In order to have only the one good photo of a series in view in the Grid View or in the Filmstrip and to hide the associated second-choice images, the photographer combines all variants of a motif into a stack. The reward for the minor effort is a much better overview and quick access to the hidden variants of the motif.
How does it work?
Starting with the hero of the series, all photos are selected one by one by shift-clicking or by cmd-clicking.
> Activate Bsp7.
> Shift-click Bsp8 and cmd+G.
The photos are now in a stack on top of each other. The hero, i.e. the first photo selected, is on top and is the only photo visible in the stack.
The Stack icon in the upper left corner of the thumbnail tells us that the stack consists of two photos. If you click on the Stack icon, all photos of the stack will be displayed on the light table again. If you click again, the photos will be stacked again.
> Click the Stack icon and click again.
This can also be done by clicking on the two vertical hatches to the left and right of the thumbnail. And you can do it even faster by pressing the S key.
> Press the S key and press it again.
Of course, the hero is also displayed in the Loupe View.
> Press the E key.
Now let’s turn to the right side panel of the Library.
The structuring of the catalog by nesting in folders, collections and stacks is complemented by the clever assignment and use of keywords and by editing the metadata of a photo.
Keywords and Comments
We will not be able to deal with the creation and use of keywords and comments in the Praxismodul due to time constraints. However, you should explore keywording on your own if you have the opportunity. Once you get the hang of it, it’s very quick and gives you great search and filtering options.
Metadata
Before we turn to developing, we need to take a quick look at metadata.
What does this ominous metadata consist of? Where does it come from and what is its purpose? Let’s answer these three questions very briefly.
> Open the Metadata panel.
> Activate Metadata Set EXIF and IPTC and scroll down.
Metadata is the technical information generated by digital cameras about a photo. This so-called EXIF data (Exchangeable Image File Format) is stored in the XMP standard (Extensible Metadata Platform) and is part of the Raw file.
EXIF data includes capture time and date, f-number, ISO value, lens information, and much more. All important information that is used by the photographer and, more importantly, the image editor to identify and qualify photos.
In addition to this camera-generated metadata, which is picked up by Lightroom during import, other categories of metadata are accessible.
IPTC (International Press Telecommunications Council) is an international information standard for tagging text and images. This professional standard allows entries for descriptions, keywords, categories, image rights, and origin. This specific information is largely generated in Lightroom and can be customized and added to in the Metadata panel.
Now, of course, the photographer would like to have mandatory information automatically applied to her photos. For example, you don’t want to have to assign the author’s name to each photo individually.
To achieve this, you create personalized presets.
> Metadata panel / Presets menu: Open Edit Presets.
> Scroll to “Creator”: “Max Mustermann”.
> Preset menu / Save as “MM-Presets” and Done.
Now it’s easy to apply the personalized metadata to one or more photos.
> Switch to Grid View. Activate Bsp1.
> Metadata panel / Presets: Assign MM-Presets.
The real beauty of personalized metadata presets is that they can be applied to the new photos during the import process. I have already pointed this out.
This brings us to the end of our tour of the Library. The Library has proven to be Lightroom’s core image management module.
Now let’s turn to the other important task area in Lightroom: developing photos.
> Activate Bsp2.
Histogram
The histogram shows the tonal distribution of an image and is an important tool for the photographer and the image editor to assess the quality of the image. It is therefore an important decision-making aid for photo selection, even in the library.
Images with a poor tonal distribution are not even sent for development.
The control panel also contains other important information about the photo that the image processor always likes to have in view.
- The ISO value, focal length, f-number and shutter speed indicate the camera settings of the shot.
- The note “Original Photo” means that the link between preview and original data is upright.
The histogram in the Library already indicates what we will be dealing with in the Develop module.
Like the Navigator, the Collections and the Filmstrip, the histogram appears in both main modules, in the Library as well as in the Develop module.
Develop
> Switch to the Develop module.
Camera Raw
The Lightroom Develop module corresponds to the Raw converter known from Photoshop and the Bridge, called Camera Raw. So by develop, the photographer means the so-called Raw conversion.
Camera Raw generates a color image from the raw grayscale image data and the metadata (type of shot) also contained in the Raw, as well as the information about the camera model. Only this color image is accessible for processing in Photoshop.
By now it should be clear why we talk about previews in Lightroom.
Since we can only deal with the most important development tasks in the Praxismodul due to time constraints, I would like to take this opportunity to refer you once again to my Photoshop Advanced Workshop, which I will be holding in the coming winter semester. There, we’ll take an in-depth look at Camera Raw features and tools.
In Lightroom, all developing tasks are done in the right side panel of the Develop module.
So, in a nutshell, what are the most important tasks we do in the Develop module? Let’s start with the basics.
Basic
> Expand the Basic panel.
In the Basic panel, we make the basic settings.
Treatment:
With the Treatment buttons we determine whether the image should be further processed in the color process or in the black & white process.
> Black & White and back to Color.
Profiles:
> Open and close the Profiles menu.
The profiles listed in the Profiles menu can be called presets, since they create the initial situation for the Raw conversion.
Our preview was rendered with Adobe Color when importing the photo to Lightroom. And we want to leave it at that. Because Adobe Color is the standard profile for all Raw files. It guarantees the most natural, neutral color conversion possible and generates a usable starting situation for all subsequent settings.
The first measure we usually set when developing is the white balance.
White Balance:
With white balance, you want to create a neutral light situation in the image. After the image import, the color temperature and tint appear unchanged As Shot.
Due to the influence of ambient light or the flash when taking the picture, color casts can occur, which can now be removed via a white balance.
The White Balance Selector offers us a quick way to do this.
> Activate White Balance Selector.
For a white balance with the White Balance Selector, we click on an image zone that we want to appear in a neutral gray.
If we move the eyedropper to the upper right corner of the image, we can see from the result that the gray ceiling tile has a slight blue overhang.
> Click with the White Balance Selector into the upper right corner of the image.
The color cast has been removed from the entire image with a single click. In most cases this simple measure is sufficient to achieve a perfect white balance.
If you want to work more precisely or if you can’t find any gray areas in the image that should be neutralized, you can fine-tune the white balance using the two sliders Temperature and Tint.
As an aside, the plus-minus symbol in the lower right corner of the thumbnail in the filmstrip indicates that the image has been edited.
Let’s press the reset button.
> Press the Reset button.
Temperature:
The color temperature can be either too warm or too cool, depending on whether the photo was taken in a rather warm or rather cool ambient light. Accordingly, the image has a yellow cast or a blue cast.
> Temp: 5600 by numerical input.
> Press Enter key.
Tint:
The color tone can be either magenta-tinted or green-tinted. Accordingly, the image has a magenta cast or a green cast.
> Tint: 0 using the arrow keys.
> Press the Enter key.
Let’s look at the whole thing in Before/After mode.
> View / Before/After / Before only.
We use for this very often needed function of course the corresponding shortcut Backslash.
> Press Backslash (= alt-shift+7) several times in a row.
We can also display the before and after view side by side in a split screen.
> Activate Before and after View by pressing the corresponding button of the View bar or pressing the Y key and go through the different view options via shift+Y.
To exit the split screen view, we press the Y shortcut again. Or we return to the normal view of the Develop module by pressing the first button of the View bar or the shortcut D for Develop.
To repeat, here again is a summary of the three key shortcuts for finding the two main modules.
- E for Loupe View Library module,
- G for Grid View Library module and
- D for Normal View Develop module.
With these three shortcuts, we quickly switch back and forth between the two main modules as needed.
Exposure:
After white balance has been performed, we analyze the exposure and correct it if necessary.
If the photographer’s intention coincides with that of the image editor, we do not need to intervene. If, on the other hand, the image is too bright or too dark, the exposure must be corrected.
The exposure control can be compared to the aperture or shutter speed setting of a camera. It is operated to lighten or darken the overall image.
I would darken the image by about a quarter stop, maybe a little less.
> Exposure: -0.20 with arrow keys.
With exposure correction we have done the first step of tone correction.
Exposure correction sometimes makes the image look a little washed out. Our image made a dull impression right from the start. Now we need to fix that with a quick contrast enhancement.
For this and similar measures, the tonal values should extend over the entire range, i.e. from the far left to the far right of the histogram.
Whites/Blacks:
I therefore do not start the contrast enhancement with the operation of the contrast slider, but first reach for the black slider to spread the histogram to approximately the full width.
> Blacks: Shift-clicks down arrow: -50.
With this we have set the black point. At the right end of the tonal spectrum, we don’t need to compensate for a gap. So we leave the white point untouched.
You see, with this operation, which by the way is called linear contrast enhancement, we have already achieved a significant contrast improvement. A further improvement by operating the actual contrast slider therefore only serves for fine-tuning.
Contrast:
> Pull up the contrast slider strongly: +100.
Contrast is desirable in most cases, but we should not overdo it. We certainly don’t want the pure white zones in the image to spread even further.
Once a setting has been made, it can be reset to zero with a double-click on the slider.
> Double-click Contrast slider.
> Contrasts: Shift-click Up arrow: +10.
Highlights/Shadows:
To better balance the contrast, we can darken the light areas of the image a bit and lighten the dark areas a bit. We do this with the Highlights and Shadows sliders.
> Highlights: Shift-clicks down arrow: -60.
> Shadows: Shift-clicks up arrow: +40.
Now let’s compare our result with the original look of the image.
> Apply Before only (alt-shift+7) several times.
Since we are so far satisfied with the result of the first tone correction, before we do the next exercise steps, let’s capture the state with a snapshot. This is purely a safety measure as part of the Praxismodul.
> Snapshot: “WB, Tone”.
Multiple use:
Once you have made perfect settings and you want to apply them to another image, click the Copy button of the left side panel and copy the settings. Use Paste to apply them.
> Press the Copy button.
> Switch to Bsp3 in the filmstrip.
> Press the Paste button.
> Back to Bsp4.
Let’s take a quick look at the Presence segment of the Basic panel. Let’s zoom in on the young man’s face.
> Navigator 1:1, move the section.
Texture:
With the Texture slider you edit the contrast in the shadows and highlights of the smallest image structures. It can be used to reduce noise or, on the contrary, to increase local sharpness. The Texture slider is a relatively crude tool and should be used carefully.
> Drag the Texture slider.
> Last Texture: -30.
Clarity:
Clarity increases the local contrast and saturation in the midtones. The elements on this texture layer get more three-dimensionality by dragging the Clarity slider to the right.
> Move the Clarity slider strongly.
Just as with exaggerated structural emphasis, pores and freckles mutate into pimples and other skin blemishes if the Clarity slider is operated too strongly. A careful increase in clarity increases the plasticity in our image without making certain areas of the skin problematic.
> Last Clarity: +20.
Let’s return to the Fit view by pressing the space bar.
> Press Spacebar.
Dehaze:
Dehaze does exactly what the name promises. Basically we are dealing with an intelligent exposure correction.
> Move the Dehaze slider strongly.
> Last Dehaze: +20.
You can achieve good results when retouching hazy landscape shots, foggy lenses, smoky barrooms or even over-illumination.
The last two sliders on the Basic panel can be used to edit the saturation values in the image. Since Saturation and Vibrance are identical to the familiar functions from Photoshop, we don’t need to take a closer look at them now.
Now let’s create another snapshot.
> Add Snapshot: “Basic”.
With this, we have learned the options of the most important develop panel in a quick run-through.
> Scroll up the panel menu to see all the other entries.
Of the other panels, we’ll just pick out a few items that should not go unmentioned.
Solo Mode:
If we unfold the Tone Curve control panel, we notice that it gets crowded in the right side panel of the Develop module. In order to keep an overview and always have only the currently needed control panel open, we activate the solo mode.
> Right-click e.g. on the Tone Curve bar: Solo Mode.
Tone Curve
The Tone Curve settings in Lightroom are used to fine-tune the tonal distribution that you have made in the basic settings.
I assume that you are familiar with working with tone curves. Tone Curves are one of the most important tools in Photoshop for making tonal and color corrections.
If you’re not quite sure where to drag on the curve, activate the Direct Adjustment Tool in the upper left corner of the panel and do the manipulation directly in the image.
> Activate Direct Adjustment, target the left spotlight.
> Set the highlights to -50.
> Deactivate Direct Adjustment.
For a quick comparison between before and after, the settings made in the current control panel can be deactivated and reactivated by pressing the eye icon.
> Press eye icon.
If we are not satisfied with a correction, we do not have to immediately press the reset button and reset everything. All single control panels can be reset separately by holding down the option key.
> Option-click “Reset” (or back to Snapshot “Basic”.)
Color Mixer
The HSL-Adjustments offer a comfortable possibility to make selective color or tonal corrections. The procedure follows the HSL (hue/saturation/luminance) scheme and is highly intuitive.
Hue:
Using the hue sliders, you can modify specific color areas in the image. For example, if you want to change the red tones in the image, drag the red slider, etc.
> Reds: +100; Oranges: +100; Yellows: +70.
You move the sliders back and forth between two colors adjacent to each other on the color wheel.
If you want to change the poison green of the liquid in the test tube, pull the green slider accordingly.
> Green tones: -100.
The settings you make will be applied to the entire image, not just to the targeted location.
Saturation:
> Bring the Saturation panel to view.
> Operate any slider.
With the Saturation sliders we finetune the basic saturation settings we may have made in the Basic panel.
Luminance:
> Bring the Luminance panel into view.
> Operate any slider.
We use the Luminance sliders to determine the brightness values of the different color areas accordingly.
The HSL-Adjustments are more for modifying the color than for coloring. Let’s reset the settings of all three control panels Hue, Saturation and Luminance.
> Option-Reset Mixer.
Color Grading
> Bring the Color Grading panel to view.
> Modify highlights and reset.
The Color Grading panel allows you to apply color grading to different brightness levels. Here, the midtones, the shadows, and the highlights can be color modified separately.
Color grading can be used, for example, to simulate effect lights in the image, but it is also quite suitable for coloring black and white photos.
Details
The Detail panel can be used to perform two important image processing tasks: sharpening and noise reduction.
> Open the Detail control panel.
Sharpening:
Sharpening is essential. In any case, as part of the Raw conversion and thus also in Lightroom, the image should be provided with a good basic sharpness.
The small call sign in the upper left corner of the control panel alerts me that sharpening should be done at a higher zoom level. Only at a zoom level of 1:1 or higher do you have sufficient optical control.
> Click on the call sign icon.
> Navigation to the young man’s face.
A look into the control panel shows that Lightroom is already sharpening the image. And it’s doing so with an amount of 40, a sharpening radius of 1.0, and a detail preservation of 25.
Sharpening means increasing the contrast in the edge area. With a targeted contrast increase, the local edges in the image are strengthened. Which pixel areas are included in the sharpening should be carefully considered. Here, too, the following applies: a skin pore that is too sharp can quickly grow into a pimple, a slight reddening of the skin suddenly becomes eczema.
> Amount via shift-clicks: 60.
> Radius via shift-clicks: 1.6.
> Detail via shift-clicks: 35.
> Masking via shift-clicks: 60.
By increasing the Masking value, homogeneous inner zones can be excluded from sharpening. Masking is an important option, especially for careful skin retouching.
In the Photoshop Advanced Workshop, we will take an in-depth look at input sharpening and output sharpening.
Noise Reduction:
Even gentle sharpening sometimes brings an increase in image noise. So it is no coincidence that noise reduction and sharpening are combined in one control panel.
When using Noise Reduction, you should always make sure that you only reduce the image noise, but do not damage the microstructure of the skin.
We can perform the task with AI support or manually.
> Unfold Manual panel.
> Luminance via shift-click: 10.
Lens Corrections
Lens corrections are one of the basic operations in Lightroom.
In the Praxismodul, I’d just like to quickly point out two aspects of Lens Corrections. As I’ve mentioned before, you can learn more about this topic in my Photoshop Advanced Workshop. Everything that Lightroom offers in the Develop module is also available in the Camera Raw environment of Photoshop.
Remove Chromatic Abberation:
Let’s take a quick look at the Profile panel options. Here we can, for example, remove the dreaded chromatic abberations.
Are there chromatic aberrations in our image? Of course and even very clearly …
> Navigator 800%, zoom on the hairline of the young woman.
These unwanted color fringes are called chromatic aberrations. Even the best lenses cannot suppress these color shifts to green and magenta or to blue and yellow.
> Activate the Remove Chromatic Abberation checkbox.
In most cases, the problem has already been solved with this simple measure. If you still see color fringes, you can remove them manually with the Defringe function of the Manual tab.
> Bring the Manual panel into view.
Here you can also edit the vignetting and the two classic distortions, pincushion and barrel effect. But we’ll return to the Profiles tab right away.
> Bring the Profiles panel into view.
> Press zoom level FIT via space bar.
Enable Profile Corrections:
Another insufficiency caused by the lens can usually be corrected in the Lens Correction control panel by activating a checkbox, namely lens distortions.
> Activate the checkbox Enable Profile Corrections.
If you activate the profile corrections, Lightroom reads the lens parameters from the EXIF data of the image and then reduces the geometric distortion and any vignetting that may occur (wide angle).
If necessary, the Distortion and Vignetting sliders can be used to help a bit more.
If you want or need to make the assignment yourself, select the lens manufacturer, the lens model and a suitable profile or make the two corrections using the corresponding sliders on the Manual tab.
> Switch to Manual and finally back to the Profile panel.
Transform
If the image requires deep perspective changes, you can use the settings of the Transform panel. We will not pursue this any further now. Play with it yourself in a quiet minute or take part in the more detailed discussion in the Photoshop Advanced Workshop.
> Add snapshot: “Basic, Detail, Lens Corrections”.
I would also like to briefly mention the other panels here.
Lens Blur
The Lens Blur panel allows you to capture and modify the depth of field areas of the image. If you don’t want to do this work in Photoshop, you can already take the appropriate measures here in Lightroom.
This feature is currently still in beta and must first be installed before use.
Effects
In the Effects panel, we can set a vignetting and add photo grain.
Calibration
The Calibration panel allows you to adjust the color settings of the camera.
Finally, let’s take a quick look at the most important tools in Lightroom classic’s Develop module.
Toolbar
Crop Overlay:
Let’s start with the Crop Overlay function and the Straighten function, which are combined into one tool.
> Activate Crop Overlay.
Both functions are of great importance for the photographer in Lightroom.
- Photos sometimes need to be cropped to a reasonable target format and …
- Photos also need to be straightened at times.
As soon as the Crop/Straighten tool is activated, a cropping frame appears whose size can be adjusted and which can also be rotated.
> Drag and rotate.
> Press the tool reset button.
The Straighten tool is used in a similarly intuitive way.
> Straighten tool and draw a horizon line in the photo.
> Or numerical input: 5°.
Once you have made the settings to your satisfaction, you complete the cropping process by clicking on the Close button. The cropping and straight alignment are applied immediately.
And now the highlight! When the Crop/Straighten tool is activated again in the toolbar, it shows that the crop has not been discarded. The photo always remains accessible in its original format. So also the Crop functions are non destructive.
> Press the Reset button.
Next we reach for the Spot Removal Tool.
Spot Removal Tool:
As the name suggests, this is a convenient way to retouch small image flaws and other imperfections.
> Expand the Spot Removal Tool settings panel.
The tool offers us three application modes:
- Remove: Use this option when you want to remove objects or when you need to artificially create texture during removal because there are no suitable source areas in the image for a simple transfer. AI support can be enabled for the Remove function.
- Heal: Applies the texture, exposure, and colors of the source area to the target area to be retouched. This is similar to the way the Healing Brush works in Photoshop.
- Clone: Duplicates the source area of the image to the target area. This is the same as the Stamp tool in Photoshop.
In the majority of cases we use the Heal function.
> 1:1 zoom on the young woman’s face.
Our first targets are, of course, the slight skin blemishes in the chin area.
Before we get started, we quickly select a suitable brush size and set a feather value. Both can be done with the sliders or by using the scroll wheel to resize and by using the scroll wheel while holding down the Shift key to modify the soft edge.
> Heal Tool: Size 20 / Feather 100 / Opacity 100.
The opacity will be 100% in most cases.
> Spot Removal.
A single click on the spot to be retouched is enough: Lightroom inserts a patch from a comparable source area and adjusts it to fit the target environment.
The position and size of the source area can be modified later at your leisure, should the Lightroom suggestion not have produced the desired result.
> Move and enlarge a source area.
The Heal Tool works wonders on local areas. With the AI support of the Remove Tool, you can also achieve smooth, even retouching across large areas.
Masking:
> Enable Masking.
The Masking feature provides very powerful tools in Lightroom and in Camera Raw. It can be used to apply many different settings locally. In our limited time crash course, we’ll pick out just the most important function and take a closer look at working with the Adjustment Brush tool.
> Masking: Activate Brush.
A look at the Effects panel reveals a number of adjustment options that we already know from other panels. But unlike the adjustment options in the Basic, HSL, Detail, etc. panels, the Adjustment Brush lets us apply all effects locally and not just to the entire image as in the panels.
If we want to smooth the texture locally, increase the clarity or dehaze, we already know which sliders to operate. Instead, let’s give the lips a little more life.
When working with the Adjustment Brush, it’s a good idea to zoom in on the area you want to work on.
> Zoom in on lips 400%.
The following process takes place successively in two steps. In the first step we brush a mask to ensure that the desired effect is applied locally. In the second step we determine the parameters of the desired effect.
First, let’s build a suitable tool tip.
> Brush panel: Activate Brush A.
We can’t get lost in all the fine details now. Let’s just define size and feather.
> Adjustment Brush: Size 5.0 / Feather 80 / Flow 100 / Density 100.
First we set a pin in the zone that should be processed.
> Place a pin in the center of the upper lip.
So that we can better estimate the area that is now to be covered by brushing a mask, we make sure that the Show Overlay checkbox is activated.
> Activate Show Overlay (O) if necessary.
If we have selected Color Overlay as the Overlay Mode in the footer of the Mask panel, the brushed area will be marked with red mask color. The goal is to paint all the zones that will be modified with mask color.
> Create a mask for the lips.
Once that is done, we move on to creating the effect that will be applied.
Since we do not want to be irritated by the mask color when creating the effect, we temporarily hide it by pressing the O key.
> Hide the mask color by pressing the O key.
We achieve the coloring effect without thinking twice by manipulating the Temperature and Tint sliders.
> Temperature via shift-click: 10, Tint via shift-click: 40.
We darken the image by lowering the Exposure value.
> Exposure via single click: -0.10.
Let’s have a look at the result in 100% view.
> Navigator: 100%.
If we want to make a before and after comparison, we can do this by deactivating and reactivating the eye symbol in the mask panel.
> Deactivate and activate the eye symbol.
With that, we’ve learned the basics of working with masks in Camera Raw, and I think it’s become clear how valuable this tool is for editing detail areas.
Now let’s finish off the editing by pressing the Close button.
> Press Close.
History
I would like to say a word about the History palette: Unlike Photoshop’s history palette, Lightroom’s saves the complete editing history forever.
> Open the History panel, scroll all the way down and close it again.
Editing in PSD
More advanced, in-depth, and complex image editing is done in Photoshop, not Lightroom.
The interaction of the two programs, Lightroom and Photoshop, is virtually mandatory in a professional workflow and works wonderfully.
Editing a photo in Photoshop is possible within the Lightroom workflow.
> Activate the edited image (Bsp2) again, if necessary.
> Navigator: FIT.
> Photo / Edit in / Edit in Adobe Photoshop (cmd+E).
Photoshop starts and the image is opened.
Let’s pay attention briefly to the profile warning that appears during the startup process: The ProPhoto RGB profile is embedded in the original image.
We will keep the embedded profile unchanged.
Let’s take a look at the title bar of the image …
- The file name extension still identifies the image as a Raw file.
- Our image is in RGB color mode.
- Our image has a bit depth of 16bit/channel.
- The small asterisk indicates that the image is not displayed in our working space Adobe RGB (1998), but in a different profile. But we already know that.
In other words: What we have here in Photohop is the maximum of image information that the HiEnd photo brings. So the starting position for any image processing that follows now is ideal.
> New Adjustment-Layer: Color Balance: Midtones 0 / +100 / 0.
Once you have finished editing, save the image using the usual Save command (cmd+S).
The file extension now identifies the image as a TIFF file. Photoshop does not overwrite the original file, but creates a copy of it when saving. And this TIFF master file is placed in the directory where the original file is located.
> Switch to the Finder / Shootings / Maxx Fashion / Bond Campaign.
In addition to the file extension, the name suffix “Processed” also indicates that this file is a working file created in the Lightroom/Photoshop workflow.
If we return to Lightroom, we find that the edit has already been applied.
> Switch to Lightroom.
In the filmstrip, we find the Photoshop edit and the Lightroom edit combined into one stack. This makes sense. This way you can switch back and forth between the two versions without a long search.
Export
Once you have finished editing a photo, the next step is the output process.
We’ve already briefly touched on Lightroom’s output options. In relevant modules, we can create photo books, export a slideshow, use Lightroom print templates to prepare a print output, and publish to the web.
In the majority of cases, however, the professional photographer will need to create output files for distribution to professional image editors or graphic designers. This can be done in a simple and specific way in the Export dialog.
> File / Export… (cmd-shift+E).
Besides choosing the destination, we can make many other crucial settings for exporting a file here.
> Export to: Hard Drive.
> Export Location: Desktop; Put in Subfolder “Bond Kampagne”.
> File Naming: Rename / Custom Name, Custom Text: “Poison”.
> File Settings: Image Format PSD; Color Space Adobe RGB (1998); Bit Depth: 8 bits/channel.
> Image Sizing: Resolution 300 ppi.
> Export.
I don’t want to conclude our brief discussion of Lightroom classic without addressing two important points about workflow hygiene.
Cache
The so-called cache memory is used to temporarily store the original image data when creating high-quality previews.
> Lightroom Classic / Preferences / Performance.
> Camera Raw Cache Settings: Maximum Size 10.0 GB.
The default allocation is 5.0 GB. If a large number of images are to be processed repeatedly, it is recommended to increase the value to 10 or even 20 GB. This speeds up the calculation of high-quality previews noticeably.
At the same time, however, one should not refrain from completely emptying the cache memory from time to time in order not to evoke the opposite effect, namely the slowing down of the working speed.
The cache is emptied by pressing the Purge Cache button.
If this measure did not bring the hoped-for acceleration of the working process, an optimization of the catalog can bring the desired success.
> Panel Catalog Settings: Optimize Catalog… and cancel.
Back-up plan
The second measure that the professional photographer should not ignore is the creation of a back-up plan for the catalog. Lightroom provides the ability to create an additional backup copy of the catalog file.
The back-up plan for additional backup of the catalog file is quickly set up.
> Lightroom Classic / Catalog Settings / General / Backup up catalog: Once a week, when exiting Lightroom.
With this, we have learned the essential elements of Lightroom classic and the basic ways of working. Of course there is still a lot to explore, but in our Praxismodul we also want to take a quick look at two other image management programs.
Lightroom classic vs. Lightroom
Lightroom Classic is the desktop version of the well-known image management and image editing program.
Lightroom, on the other hand, is the name for the cloud-based version of the image management and image editing program.
Both programs are managed and developed in parallel by Adobe, as the focus of each program is different.
Here are the key differences between Lightroom Classic and Lightroom.
Lightroom Classic vs. Lightroom

We’ve already touched on a few typical workflows. At first glance, the cloud-based version of Lightroom offers few significant advantages for professional photographers who are used to Lightroom Classic. However, where mobility and ubiquity are required, Lightroom Cloud scores highly. For more and more photographers, there is therefore no “or” between Lightroom Classic and Lightroom Cloud, but an “and”.
However, very few professional photographers use the synchronization options that Lightroom Classic offers with regard to the Cloud version. And there’s a reason for that. In any case, anyone who has distributed their Lightroom Classic catalogs across multiple hard drives should keep their hands off the synchronization between the two programs. Adobe itself only makes a limited recommendation for synchronization.
The point is that only one Lightroom catalog can be synced at a time. When you change the catalog to be synced, the previous photos and collections are deleted from the Lightroom app. Syncing under these conditions is therefore hardly practical and at best recommended for amateur photographers working with a single catalog.
However, a sensible workflow that includes both program versions looks like this. Here again, as a reminder, is the chart we’ve already seen.
Professional photographers mobile
Adobe Lightroom (Cloud)
Now let’s launch the Cloud version.
> Launch Lightroom.
The image display area should look the same for you as it does for me. Otherwise please: Activate Grid View (G). Select (cmd+A) all photos of the All Photos module and delete them (via delete key).
Import
The empty image display area prompts us to add photos to Lightroom. In Lightroom Classic, the process was called import.
Just as in the Classic version, we can import photos directly from a camera or memory card, or from the workstation’s hard drive. In addition, it is possible to synchronize the Lightroom catalogs with an existing catalog on Android or iOS.
Tethering is not possible in the cloud-based Lightroom version. However, the absence of the tether function can be tolerated, since this feature is only used for studio work anyway.
To import images, we click the Plus icon of the Add Photos entry at the very top of the left column of the Lightroom window.
> Click the Plus icon.
> Go to “Shooting” folder; click Review for Import.
As we’re used to in Lightroom Classic, all the images found in the source folder and its subfolders appear at the light table of the Import window. We can select images for import or exclude them from import.
> Add to Album: None.
> Click Add 12 Photos.
Looking at the program window, we can already notice an essential difference between Lightroom Classic and Lightroom: The program environment makes a drastically slimmed-down impression in Lightroom: no modules, no Filmstrip, no Navigator, etc.
Lightroom’s user interface follows the UX we know from the apps on our smartphones and tablets. This makes working and navigating in Lightroom a bit more intuitive and easier than in Lightroom Classic.
In fact, the differences in features and tools between Lightroom Classic and Lightroom aren’t quite as big as they might seem at first glance.
I think it makes sense for us to focus more on the differences and less on the similarities between Lightroom and Lightroom Classic in our tour of the program. So many tools and features that we’ve already briefly explored in Lightroom Classic I’ll ignore or only briefly touch on in the sequel.
Photos module
> Photos (P).
Photos, that’s our library. With the shortcut P you can hide and show the left panel.
All Photos contains and shows all imported photos in the Photo Grid view.
> Activate Deleted.
The Cloud
Trash lists all deleted photos. Lightroom gives me 30 days to think about whether I want to permanently delete a photo or maybe keep it.
The reason Lightroom is so friendly is that “delete” here actually means delete. It’s not just deleting the previews and unlinking the photo from the catalog here, as in Lightroom Classic. In Lightroom, it actually removes the original data from the cloud.
This makes perfect sense for managing a limited storage volume, but it also has important consequences for the photo workflow.
My recommendation: Do not delete photos that are no longer needed in the cloud until the original data or edited images have been exported to a local hard drive and archived.
> Go to All Photos.
The export process is simple. You select all photos or edits and export the originals and settings to a local storage location.
> Click Share icon / Export Original.
If the photos are then imported into a Lightroom Classic catalog, they not only appear there in their original state, but all the edits and metadata from Lightroom Cloud are also transferred.
So in the management of the original files we already have a first major difference between Lightroom Classic and the Cloud-based Lightroom. All original files are stored and managed in the Cloud without exception.
Let’s take a closer look.
> Click on the cloud icon in the upper right corner of the workspace.
- Cloud Storage provides information about how much of the available cloud storage space is being used.
- Connect your devices: If you want to connect your smartphone directly to Lightroom, you can find the necessary information here.
- The checkbox in front of the entry Synced and Back Up says that all Lightroom apps are synchronized. In other words, all photos and edits are also accessible on all my other devices in the Lightroom apps installed there, for example, on my smartphone.
> Photos / Local.
Recently, Lightroom (Cloud) has also become available for managing a local photo library and editing photos stored on a hard drive. However, since I use Lightroom Classic locally, this doesn’t make much sense.
Let’s take a quick look at the Preferences.
> Open Adobe Lightroom / Preferences.
Preferences
In the Preferences, I want to highlight two items in particular.
Cache:
- Here we can see how much local storage space we need for a complete backup.
- Here we can specify the cache size.
- Here we can determine whether, in addition to the original files the Smart Previews created by Lightroom should also be saved on the hard disk as a backup.
- And, of course, we can also specify the local storage location here.
Import:
On the Import tab, we can create a copyright entry to be included in the metadata of all imported photos. Essential for professional photographers, of course.
> Done.
Albums
Albums, of course, are the Collections as we know them from Lightroom Classic.
Search and Filter
A click on the Filter icon of the Filter bar in the header area of the window makes various filter options accessible.
> Show Filter Options.
Lightroom doesn’t just search based on manually entered keywords and existing metadata. The search bar is coupled with the in-house AI Adobe Sensei. The AI scans and analyzes all photos, thereby enabling intelligent searching by entering freely selectable search terms.
> Click in the search box.
Clicking in the search box opens a palette from which we can choose various search parameters.
Keywords
Manual keyword entry is still the best basis for reliable search results.
> Expand keywords panel.
> Select all classic car photos.
> Add keyword “Oldtimers”.
> Collapse the keywords panel.
Filtering also works as usual.
> Show filter bar.
> Keyword: “Oldtimers”.
> Close filter bar; delete filter keyword from search field.
Info
Metadata also plays an important role in the search process. At the bottom of the Develop palette we can at least take a look at the most important metadata, which here – unlike in Lightroom classic – is called Info.
> Open the Info panel.
> Select Bsp2.
> Close the Info panel again.
The metadata panel in particular clearly shows that the range of functions in Lightroom sometimes lacks depth. At least the most important data about the photo is listed here. However, the customization options are very limited.
View modes
In the footer area of the window, we can choose between different view modes, determine the sort order, set ratings or flags. And here we can also adjust the thumbnail size.
Let’s just compare the three most important view modes.
Photo Grid (G):
Photo Grid displays the catalog content in a space-saving photo grid.
> Activate Photo Grid (G).
Square Grid (G):
Square Grid alternatively offers the expanded view familiar from Lightroom Classic. However, with significantly reduced information content.
> Activate Square Grid (G).
Detail (D):
And Detail corresponds to the Loup View familiar from Lightroom Classic .
> Detail (D).
In Detail View, a filmstrip is then also displayed in the lower window area.
Navigation
In the footer, the zoom level Fit, 100% and various other zoom levels are available for selection.
A click with the loup zooms the image in or out. The same is achieved by pressing the space bar.
> Press the space bar and press again.
Show Original
Clicking on the Edit options button (…) opens a small menu in which we can activate the original view of the image. This can also be achieved using the backslash shortcut (Shift-alt+7).
> Editi-Options / Click Show Original entry and click again.
Incidentally, you can also use the Before/After button in the lower right corner of the window to display the original
Develop
By activating the Detail View, we have automatically switched to Develop mode.
In the vertical palette on the right, we find most of the editing options we learned about in Lightroom Classic.
To start with, the treatment of the photos is just as non-destructive in Lightroom as in the desktop version. One can always return to the original, intact version of a photo.
Except for a few features, the range of develop options in Lightroom is the same as in Lightroom Classic.
Edit panel
> Open the Edit Panel.
Since we already learned about the most important features in Lightroom Classic, we’ll explore the panels here on the fly. First, let’s take a look at the Light panel.
> Open the Light panel.
In the Light panel, we find the Exposure and Tone controls as we know them from the Basic panel of Lightroom Classic. The content of the Light panel is rather meager compared to what the Basic panel has to offer. But we must not jump to the conclusion that the editing options in Lightroom are drastically limited. Basically, all the develop features we know from Lightroom Classic are here – they’re just arranged differently.
The Light panel lists only the tools needed for tonal correction. In addition to the familiar Exposure, Contrast, etc. sliders, these also include the Curves.
> Click on the Tone Curve icon if necessary.
> Activate Point Curve and increase contrast using a slightly curved S-curve.
The correction result can be temporarily hidden by clicking on the View icon. The obligatory Alt-key click undoes the corrections.
> Press and release the eye symbol.
> Option-click Reset Curves.
The remaining features of the Basic panel from Lightroom Classic are distributed to other panels.
> Expand Color.
We can access the color adjustment, white balance, and saturation correction tools in the Color panel.
> Activate White Balance Selector.
> White Balance by clicking in the gray ceiling tile.
The Color Mixer, the Point Color option and the Color Grading are also available in this panel. Here we find everything that has to do with color in the narrower sense.
The tools for editing the image textures are available in the Effects panel.
> Open the Effects panel.
> Dehaze: 60.
We perform sharpening and noise reduction in the Detail panel.
> Expand Detail.
We make lens corrections in the Optics panel.
> Open Optics.
And we adjust perspective in the Geometry panel.
> Expand Geometry.
Tools
Let’s now take a look at the toolbar.
The Crop, Rotate and Geometry functions are combined in one panel.
> Expand Crop, Rotate, Geometry.
The Removal tools also form their own tool group here.
> Expand Remove.
And of course we also have full access to the important Masking function in Lightroom with its specific setting options for local application.
> Expand Masking.
The editing stages are listed in the Versions panel of the toolbar.
> Expand Versions.
This is an extended history function that allows you to call up individual history states in the style of a snapshot and export them if required.
> Expand the thumbnail menu.
The individual snapshots are created automatically. So we don’t have to worry about it.
Further Edit options
> Open Edit Options (…) again.
In the Edit Options menu, Copy Edit Settings allows you to apply the settings you have made to other images.
And the entry Reset Edits cancels all modifications made to the image.
> Reset to Original (Cmd+R).
The Edit in Photoshop function can also be triggered here. Since we already learned about this advanced editing option in Lightroom Classic, we don’t need to discuss it again here.
Presets
Lightroom of course also offers access to an extensive Preset menu. In Lightroom Classic, the presets can be found in the left side panel of the Develop module. Here in the cloud version, they occupy a more prominent position. They are located at the top of the toolbar.
> Activate Presets.
> Select any preset and apply it to the image.
The reason for this is probably that the Presets make it quick and easy to create a specific look on the fly. In our mobile world, this is becoming more and more important.
Adobe would also like to emphasize that its image management program can certainly stand up to its biggest competitor in this respect.
Let’s switch back to Photo Grid View (G) and show the Photos panel (P) again.
> Photo Grid View (G).
Capture One
In addition to Adobe, there are of course a number of other providers of image management and editing software that have been created specifically for photographers.
I would like to briefly introduce the best-known competitor, Capture One, so as not to give the impression that there is nothing else out there beyond the Lightroom universe.
Unfortunately, we can only take a brief look at the program here in the Praxismodul. So I will just address the most important points and highlight the relevant differences compared to Lightroom.
> Start Capture One.
Capture One is a high-end image management and editing program that is valued by many professional photographers.
- Capture One is even preferred over Lightroom Classic, especially for studio work. The controls leave nothing to be desired when tethering.
- Many photographers also like to use the numerous presets and styles that Capture One provides, some of which are available for further implementation, to give their photos a specific look.
Importing
Importing images is not much different from the functions available in both versions of Lightroom.
> Press the Import button in the menu bar.
- In the Import from panel, select the import source.
- Using the settings in the Import to panel, you can define a destination folder during the import.
- The contents of the folder selected for import are displayed as usual on the light table.
> Switch from Grid view to Viewer view by pressing the G key.
- Press the G key to quickly switch from Grid view to Viewer view and vice versa.
- The Zoom slider can be used to adjust the display size of the previews.
- The import process is triggered by pressing the Import button.
Let’s first familiarize ourselves with the program environment. Much of it will be familiar to us.
Library
Like Lightroom, Capture One has a modular structure. Let’s start by familiarizing ourselves with the Library module.
> Press the Library button.
- The central Preview panel is flanked by two side panels.
- The upper area contains a bar with basic functions, which also includes a toolbar.
- The buttons for activating the various modules are located in the header of the left side panel.
Let’s take a look at the left side panel.
Catalog:
> Activate Catalog Collections / All Images.
Capture One also stores the imported images in a catalog. As in Lightroom, the original raw files are not changed. Working in Capture One is non-destructive.
Collections and Folders:
In addition to the Catalog Collection, User Collections can also be created in the catalog and Folders on the hard drive. User collections are what we know from Lightroom Classic or Lightroom as collections or albums.
> Activate any image in the filmstrip.
Filters, Keywords, Metadata:
In the left side panel, we also find the Filter functions and the option to define and manage Keywords for more or less intelligent searches.
At the bottom of the panel, the Metadata can be read and edited.
The images are displayed in the central Preview panel for viewing or editing.
Here, we can first choose between a Grid view and the Viewer view. We do this by pressing the corresponding buttons in the header of the panel or by pressing the G key.
> Switch between Grid and Viewer view, last Viewer.
In the Viewer, the right-hand side panel contains a Filmstrip that can be used to navigate through the catalog or collection.
> Cmd+A.
Cmd+A displays all images in the Filmstrip in the central Preview panel in a lightbox style.
To switch from Multi View to Primary View, press the first button in the row at the top of the panel.
> Press the Toggle Primary/Multi View button and press it again.
Cmd-Shift+A deselects the selection.
> Activate Bsp2.CR2 in the Filmstrip.
You can zoom using the mouse wheel or the Zoom tool, which can be activated by pressing the Z key.
> Zoom using the mouse wheel or the slider in the header.
> Press the Z key and zoom using the Zoom tool.
> Click on a targeted image area to zoom in step by step.
Pressing the H key activates scroll mode. Double-clicking in scroll mode brings the clicked area to 100% view. Double-clicking again activates Fit on Screen.
Pressing the V key returns us to the Select tool.
> Press the V key.
Tether
> Activate the Tether button.
Just like in Lightroom, tethering is possible in Capture One with a whole range of cameras and camera manufacturers. A list of supported formats can be found on the Capture One homepage. In terms of ease of use, however, Capture One has the edge over Lightroom.
Let’s take a look at the other modules.
Shape
> Activate the Shape button.
In the Shape module, you can edit geometric distortions, i.e., lens distortions, as well as camera tilt, perspective distortions, and chromatic aberrations. The crop and rotate functions can also be found in this panel.
Let’s take a look at how Lens Correction works in Capture One. To do this, choose one of four options in the Profile menu.
> Lens Correction: Open the Profile menu.
- If the EXIF data contains information about the lens used during shooting, you can choose to automatically correct distortions. To do this, simply select the corresponding lens name from the Recommended Lenses section of the menu.
- If you want to edit the barrel effect of a wide-angle shot, select Generic and adjust the optics using the Distortion slider.
- If, on the other hand, you want to counteract the pincushion effect of a telephoto shot, select Generic pincushion distortion.
- In addition, Capture One also lists a large number of commonly used lens profiles that can be used for correction.
Style
> Activate the Style module.
Base Characteristics:
The Base Characteristics contain a reference to the engine used for raw conversion. Capture One 20/21 is state-of-the-art. This is comparable to the Lightroom profile Adobe Color.
Common color profiles can also be assigned here to change the color space.
Styles and Presets:
In the Style module, we have access to numerous styles and presets that come with the program. These can be used to apply filter effects and looks to the image. Of course, this basic set of styles can be expanded. Capture One offers various style collections for implementation on its own homepage.
The panel also provides access to styles you have created yourself, provided they have been saved.
> Open Film & Cine Looks and activate Film F400.
The style applied to the entire image appears as an entry in the header area of the panel.
Adjust
> Activate the Adjust module.
The Adjust panel offers all the settings familiar from Lightroom for correcting the tonal values and colors of an image, plus a little more.
Let’s just pick out the most important features here.
The Histogram is displayed in the header of the panel, where the color changes you have made can be seen immediately. We have already heard about the importance of the histogram. I will explain in detail how and why the histogram can be used in the Photoshop Advanced Workshop in the winter semester.
White Balance:
As in Lightroom, white balance can be adjusted using the White Balance tool.
> Activate the White Balance tool and adjust the white balance.
> Finally, deactivate the White Balance tool.
Exposure:
The Exposure panel allows you to adjust the exposure, brightness, and contrast.
> Contrast: +20, Brightness: -10.
High Dynamic Range:
In the High Dynamic Range panel, you can edit the highlights and shadows and set a black point and a white point.
> Highlights: -50, Shadows: +30.
Levels:
Levels offers the option of linear contrast enhancement. The panel corresponds to the Levels dialog in Photoshop.
> Open the Levels panel.
Curve:
Curve corresponds to the curves in Photoshop and Lightroom.
> Open the Curve panel.
Color Editor, Color Balance, Black & White:
Color adjustments are made with the Color Editor and the Color Balance options. And, of course, you can also convert images to black and white here.
Let’s take a look at how the basic color of the image can be changed.
> Open Color Editor.
> Open Layers & Masks.
Since we don’t want to change the color of the entire image, we’ll use the handy mask function. This works by creating mask layers. We’re also familiar with this process from Lightroom.
I start by selecting the area I want to change.
> Press the H key and double-click on the young man’s face to zoom in.
> Create a new adjustment layer by pressing the plus button in the layer panel.
> Rename the adjustment layers by double-clicking and entering “Face #2.”
> Activate the Brush Tool by pressing the B key. Adjust the brush tip using the Ctrl-Option shortcut.
The tool tip of the Brush Tool can be adjusted using the same shortcut as in Photoshop, i.e. by pressing Ctrl-Option and dragging.
> Brush a mask onto the young man’s face.
The M key activates or deactivates the mask view.
> Deactivate the mask view.
> Activate the Direct Color Editor tool and remove some red from the young man’s face.
> Finally, deactivate the Color Editor tool.
I would just like to note here that the different skin tones can be fine-tuned and matched to each other in the Skin Tone panel of the Color Editor. It would be nice to have such a convenient and precise tool for leveling different skin tones in Lightroom as well.
Clarity:
> Open the Clarity panel.
As in Lightroom, the microtexture of the image can also be edited in Capture One using the Clarity settings. This allows you to use the negative clarity effect to gently smooth the skin texture. I’ll show you exactly how this works in the Photoshop Advanced Workshop, where we’ll take an in-depth look at skin retouching techniques.
> Clarity: -30.
> Double-tap the image using the H key to zoom out to Fit on Screen.
> Hide the adjustment layer for a before/after comparison.
> Finally, hide the Face #2 layer and activate the Image layer.
Dehaze, Vignetting:
I think we can skip discussing the Dehaze function, as well as Vignetting.
Retouch
> Activate the Retouch module.
When it comes to beauty retouching, especially editing skin areas in faces, the Retouch panel is the place to be. I won’t bother with long explanations here and will just apply the settings right away.
> Activate the face of the young man “2” by clicking on the corresponding thumbnail.
> Set all sliders to the maximum (100).
> Only the contouring should not be exaggerated: +10.
The result is, of course, a little exaggerated. But you can see how quickly and easily you can achieve attractive results with the Retouch function.
To make a before/after comparison, press the Y key.
> Press the Y button and drag the Split View slider to the left and right to compare.
Refine
> Activate the Refine module.
The Refine panel contains the tools for editing the microstructure of the image.
- Here we adjust the sharpness settings and reduce noise.
- Structural elements such as photo grain, dust, scratches, and moiré can be edited here.
I don’t think we need to look at that specifically right now.
Metadata
> Activate the Metadata module.
The Metadata module provides convenient access to Metadata, Keywords, and the Keyword Library. Here you can also save metadata presets to quickly tag images with the desired tags.
Toolbar
The toolbar mentioned above is located at the top of the window. It contains the usual tools.
- In addition to the Selection Tool, the Zoom Tool, and the Hand Tool, there are …
- Tools for editing the geometry and format, namely the Crop Tool, the Rotate Tool, and the Keystone Tool for trapezoidal correction. These allow you to make the corresponding corrections outside of the Shape panel.
I would like to point out one tool in particular here. The Retouch Tool, which is called Draw Healing Mask here.
> Open the Tools menu and select Draw Healing Mask.
> Draw the repair mask and retouch single spots.
This tool is similar to the Healing Brush we know from Lightroom and Photoshop. Capture One leaves nothing to be desired when it comes to detailed retouching.
Copy/Apply Adjustments
One last option is worth mentioning. Every now and then, it makes sense to transfer settings you have made for one image in a series to another similar image in the same series. A common goal is to apply a white balance adjustment you have already made.
There are two ways to transfer the adjustments.
- You copy a local adjustment that has been made in a single panel and transfer it to another image. To do this, make the adjustment locally and copy it by pressing the Copy Adjustments button in the respective panel.
> Masks & Layers Panel: Activate Image Layer.
> Click the Copy Adjustments button in the White Balance panel. Select “Copy” in the dialog box.
> Activate Bsp3.CR2.
> Open the Copy/Adjustment menu in the header of the window and check the copied adjustments.
> Press the Apply Adjustments button in the header of the window.
- Or you can copy all adjustments made in different panels and transfer them to another image. To copy all adjustments, press the Copy Adjustments button in the header of the window and apply them.
If you want to reset the adjustments made to an image, select Reset from the Adjustments menu or use the shortcut cmd+R.
Capture One and Photoshop
Of course, Capture One also connects and communicates with Photoshop. This allows you to open an image directly in Photoshop using the Edit With entry in the Image menu. As usual in Lightroom, the changes made in Photoshop are imported into Capture One as image variants and appear there in the filmstrip next to the thumbnail of the original version.
> Image / Edit With … Open Photoshop.
> In Photoshop: cmd+I and Save.
> Return to Capture One.
At this point, we must conclude our discussion of the Lightroom alternative Capture One. I think it has become clear that there are many similarities between the two worlds of Capture One and Lightroom. In one area of detail, one solution has the edge, in another, perhaps the other.
Capture One is primarily intended for photographers who want powerful image management and editing software outside the Photoshop-Lightroom universe. If you are looking for a compact, high-end solution that is at the forefront in terms of performance and usability, you should take a closer look at Capture One.
Let’s now turn to the fourth image management workflow outlined at the beginning, the one that relies on Adobe Bridge.
Adobe Bridge
> Launch Adobe Bridge.
To make sure we all see the same workspace, we reset the default workspaces and enable the Essentials module.
> Window / Workspace / Reset to Saved Layouts.
> Activate Essentials.
> Activate Desktop in the Favorites panel.
Bridge is the central file management program of the Adobe universe. Basically, it is a universal file browser that can be used to find, organize and, if necessary, edit not only content generated by Adobe programs, but also all other content.
Surprisingly, the program is greatly underestimated by many users. It is not only a smart way for photographers, but also for graphic designers and image editors to access the data they need. And it is especially graphic designers and image editors who, once they have become acquainted with the Bridge, will not want to do without it.
General
First, a few general observations about the program.
Bridge can be used to view, search, sort, filter, manage and process images, page layouts, PDFs and even videos.
Bridge can also be used to rename, move, and delete files, edit metadata, and even execute batch commands.
What makes Bridge especially valuable for image management and editing is the built-in Camera Raw conversion tool. It uses the same engine as the corresponding tools in Lightroom and Photoshop, and provides the usual development tools and features without sacrificing anything.
For me, as a graphic designer and image editor, Bridge is an indispensable pre-field tool.
- I use the elaborate search functions to search through my directories,
- the light table to mark favorites and make my choices,
- the built-in Camera Raw engine for Raw conversion, and
- the intelligent interaction with Photoshop in my image editing workflow.
The big difference to Lightroom and co. is that in Bridge we always deal with the original files. There is no catalog as we know it from Lightroom, but the hard disk content itself is the subject of management and processing. We will deal with this important fact in more detail.
First of all, let’s familiarize ourselves a bit with the user interface.
Workspaces
Similar to Lightroom, Bridge comes with different modules, each of which provides specific work environments. These workspaces can be activated either from the Workspace menu, as we’ve just seen, or by clicking a button in the application bar.
Essentials
With the Essentials we have the most important workspace of the Bridge in front of us. Essentials is where you search, find, navigate, review, select, etc.
Currently, the content area displays the contents of the desktop folder. In order to display our exercise files here, we use the possibilities of the two browser panels Favorites and Folders.
> Enable Folder panel.
The browser process in the Folder panel is very simple. We proceed here quite like in the Finder to browse the directories. Now please navigate to your exercise file folder.
> Open the folder one by one.
> Bring Shootings folder to view last.
What becomes clear while browsing is that the Bridge not only displays image files, but also all other file types as well as the folder structure of the hard disk.
Parallel to navigating through the hard drive directory, the breadcrumb entry grows. By clicking on the small arrow next to the folder entries we can display the subfolders and of course bring them to view.
> Expand the Shootings menu.
> Click on the city of Graz entry in the Folders menu.
If you have to go through large parts of the directory structure again and again when searching, this can be annoying at times. Therefore, the Favorites panel offers the possibility to define frequently visited folders as favorites.
> Switch to Favorites panel.
> Activate PM4 workshop data entry in the breadcrumb bar.
> Drag the Shootings folder to the Favorites panel.
> Click the Shootings folder in the Favorites panel.
Right-click the Favorites entry to remove it from the panel or display it directly in the Finder.
The folders displayed in the Content area can be opened by double-clicking.
> Double-click City of Graz folder icon.
In the footer of the window we can adjust the thumbnail sizes and choose some view option.
> Adjust thumbnail sizes.
> Try out various view options.
Panels
When an image is clicked in the Content area, a preview appears in the Preview panel and the metadata is displayed in the Metadata panel.
> Activate Bsp6 by clicking on it.
The Content area serves as a light table, the Preview area allows you to take a closer look at the photo.
The view size of the preview can be conveniently adjusted by zooming in or out of the panel.
> Enlarge preview panel horizontally and vertically by dragging the dividing lines.
If you move the cursor over the preview, the loupe symbol appears and a click into the image activates a Loupe view.
> Aim at the street lamp with the loupe.
This allows you to evaluate image details such as sharpness, chromatic aberration, image noise, etc.
Let’s keep in mind: At this point, the image has neither been imported anywhere, nor opened in any program.
> Close the loupe and reduce the size of the preview panel.
Let’s move through the rest of the workspaces and panels in a rush now. The tools and features we find here are similar to those we learned about in Lightroom. We don’t need to discuss them again. Also, as we go through Bridge, we’ll focus more on the specifics, rather than the similarities.
> Metadata panel.
In the metadata panel, we can read and edit the metadata, …
> Keywords panel.
In the Keywords panel, we can assign and manage keywords, …
> Filter Panel.
In the Filter panel we can filter and sort the filter result by various parameters.
> Collections panel.
Collections allow a central grouping of photos, even if they are stored in different folders or on different drives. In this way, images of one and the same client that are distributed in different folders can be displayed together in one overview.
> Click New Smart Collection button and cancel.
With the handy Smart Collections, collections can be created automatically based on search terms. This is also a powerful tool for locating hard disk contents and displaying them together.
Search and Find:
By opening the search menu or by pressing the classic search command Cmd+F, you quickly get access to the program’s advanced search function.
> Expand the search menu and close it again.
> Cmd+F and cancel.
On the right side of the breadcrumb bar, tools for sorting and filtering are at hand, as well as buttons for creating a new folder and for trashing.
Additional workspaces can be brought to view by clicking the corresponding entry of the application bar.
Libraries
> Show Libraries.
In addition to the Essentials, here we find direct access to the Creative Cloud Libraries, i.e. the cloud libraries in which assets are managed across programs. We know this from Photoshop, Illustrator and InDesign, for example. The libraries can also be filled and edited from Bridge.
Filmstrip
> Show Filmstrip.
In the application bar we find the filmstrip known from Lightroom. This is probably especially popular with photographers.
Output
> Show Output.
We already know the integrated output options from Lightroom.
Metadata
> Show Metadata.
The remaining workspaces are merely focusing. For example, if we want to select or sort images based solely on metadata, the Metadata workspace is recommended, etc.
Let’s return to Essentials and take a closer look at the left-hand section of the application bar.
> Activate Essentials.
History:
> Press forward/back arrows.
The two Back&Forward arrows are used to navigate back and forth in the history, i.e. to go forward or backward in work steps.
Go to parent or Favorites:
> Open the Go to parent or Favorites menu.
Clicking on the small down arrow opens the Go to parent or Favorites menu, which shows the parent folders in list form. This menu can be used as an alternative to the breadcrumb entries.
Reveal recent:
> Reveal recent menu pop-up.
The Reveal recent pop-up menu is not only handy when you want to bring back recently browsed folders, but also reveals the benefits of the integrated workflow of Adobe Creative Cloud programs. It’s a convenient way to bring up the most recently opened files in Illustrator, InDesign, and Photoshop in Bridge.
> Open the Adobe Photoshop menu and close it again.
We ignore the button with the Boomerang icon (Return to Adobe Photoshop) for now. Return to Photoshop will only become interesting to us when we work with images we already had open in Photoshop.
Import from camera:
Adobe Bridge also does a valuable job of importing photos directly from the camera.
> Click Get Photos from Camera…
Get Photos from Camera… launches the implemented Photo Downloader, but initially a small dialog asking me if I want to use Bridge to import photos in the future. Personally, I don’t want to. But only because I use a different infrastructure for my private photos.
> Press no.
In fact, the Bridge’s Photo Downloader is an ingenious tool that can do much more than just download photos from a memory card to a hard drive.
> Click Advanced Dialog.
You can specify the storage location, rename the files already during import, trigger initial conversion actions, delete the originals on the memory card, create back-up files and apply metadata presets. What more does the professional photographer want?
> Cancel.
Refine:
> Select Bsp7 and Bsp8.
> Expand Refine menu and select Review Mode.
The Refine function provides a Review Mode that allows two or more images to be compared directly. For the sake of completeness, it should be mentioned that Lightroom Classic offers a very similar function: The Review Mode there is called Survey View.
> Close menu.
And now to one of the key points of the Adobe Bridge photo workflow.
Camera Raw
The Lightroom photo import uses the Camera Raw Engine: the raw data is interpreted, the metadata is read, previews are created.
In Bridge, something very similar happens to the Raw files displayed, with the difference, however, that Bridge does not write the interpretation results to a catalog and the previews are only cached.
A second major difference is that there are no develop tools built into the Bridge itself. If you want to develop a photo, you have to start Camera Raw.
> Activate Bsp7.
> Click the Open in Camera Raw button.
The extensive Camera Raw dialog that opens offers the same tools and features as the Camera Raw dialog in Photoshop and the develop modules of Lightroom and Lightroom Classic.
We won’t delve further into the specifics of Raw conversion right now. We’ve already touched on some of this as part of our discussion of Lightroom and Lightroom Classic. A more in-depth look at that will take place, as I said, in my Photoshop Advanced workshop.
Right now, we’re mostly concerned with outlining how Bridge interacts with Camera Raw. Let’s set any action.
> Edit / Color / Tint: +150.
Once the photo development is complete, we still need to determine what to do with the file. Especially two ways are interesting for us here …
With Done we can close the image in the converted state and postpone further processing for later.
> Press Done.
The development result is immediately displayed in Bridge. The development icon in the upper right corner of the thumbnail in the content field shows the file as converted.
Now you might think that the original itself has been affected by the manipulation and irrevocably changed. This is not the case, of course.
Bridge and Camera Raw are also absolutely non-destructive in their treatment of the images. In contrast to Lightroom, however, the manipulations were not recorded in a catalog, but are written to the hard disk as a sidecar file in XMP format (Extensible Metadata Platform).
> Right-click Thumbnail Bsp7 / Reveal in Finder.
> Point to XMP file, but do not open it.
If we want to delete the manipulations to get back the original view in the bridge, it is enough to push this XMP file into the trash can.
> Return to the Bridge.
A somewhat more convenient way to undo the manipulations can be done within the program itself.
> Right click Thumbnail Bsp7 / Develop Settings / Clear Settings.
Editing in Photoshop
Let’s go into the Raw conversion again.
> Select Bsp7.
> Click Open in Camera Raw button.
> Basic / Tint: +150.
With Open Image we immediately feed the image to an edit in Photoshop.
> Press Open Image.
So via Raw conversion we enter the Photoshop image processing workflow as usual. At the latest now, I think, it has become clear why especially the image editor appreciates Bridge so immensely.
> Adjustment Layer / Hue-Saturation: Hue -180.
Once we have finished the image processing in Photoshop, we still have to save the file. The Photoshop file is saved in the same folder as the Raw file and this makes sense sometimes.
> Save via Cmd+S.
> Return to Bridge.
At this point, we end our brief tour of the world of image management and conversion.
I hope that I have given you an understanding of the different approaches so that you are now in a position to set up a customized image management workflow for yourself.
End.