Simple Character Animation
and Frame by Frame
Before we start
Become a member of our Rocket Chat group by clicking HERE.
Do you know After Effects?
In this class we’ll work with a lot of different little animations mainly in After Effects. If you have never worked with After Effects have a look at this page first to get accustomed with the interface.
Get the class material
In the Base Folder in Class-Files you’ll find a folder called Single-Files. In there are all the finished After Effects Files from this class for you to look at. You can copy them to your computer and start your work in them or start in new files.
Home Assignments
For handing in your Files please create a folder with your name in the base Folder Home-Assignments and put all your files into it.
Create one of each:
Arm, Jelly Fish, Chicken (or your own character)
hand in your versions as .mp4 files.
See Know How “Rendering” for more info.
Swoosh – export a gif from Animate
The Principles of Animation
In this great Video Alan Becker took the “12 Principles of Animation” by Frank Thomas and Oli Johnston and created animated examples. A wonderful introduction into animation:
If you want to read more about this there’s an even longer List by Dermot O Conner where he edited and expanded a few points.

Simple animation
of a Waving Arm
In this example we’ll start by learning how to import Illustrator files and transform them into AE-shape layers. We’ll learn a few basic principles of animation in AE: Keyframes, Loops, Easing, Overlapping motion
For a more detailed explanation of Loops, Easing and Overlap also have a look at the Know How section.

Create an Arm in Illustrator and import it to AE
Start with a file 1080px square in Illustrator and draw a very simplified arm. Save your file as “arm.ai”.
In After Effects import this file: Press Command + I, choose the arm.ai and for Import as choose “Composition – Retain Layer Size”

Transform into Shape Layer
Apply filter CC Bend It and Grow Bounds
To bend our Arm we use Filter → CC Bend It
Animate Bend
Start with animating the Bend value.
We need to Loop the whole thing.
First we’ll try looping with the Expression
loopOut(“cycle”)
To loop in and out we’ll change our Expression to:
loopIn() + loopOut() - value;
Add some Easing to the keyframes.
Animate Rotation
Let’s add some Rotation to our arm as well.
Problem: If you bend with CC Bend It and move your layer or rotate it the image gets cut off.
Solution: Add an expression to the Start & End Values of the Effect: toComp(value)
Offset keyframes to Overlap Animation
Add Background and render to mp4
Video coming soon …
Animation with Overlap – Jelly Fish
This time we are going to start creating our character directly in After effects.
For the jelly fish we’ll learn how to create and animate a path and create duplicates that follow this paths motion. We’ll be working with parenting a to easily be able to move our jelly fish around and give it eyes that blink and look around.
For a more detailed explanation of Parenting/Rigging also have a look at the Know How section.
Create one leg
- Create path for one leg.
- Animate the leg’s rotation.
- Animate the leg’s path itself.
- Play with offsetting the keyframes to create some overlapping motion.

Make four copies of this leg
We’ll use the pick whip for parenting in this part now. So go and have a look at the Know How – Parenting section first.
- Duplicate the animated leg four times and mirror two.
- Move the four legs apart horizontally. Make back legs darker
- Delete the four legs path animation and Property pick whip their path to the animated leg. You now have a hidden master, you can play around with, and four legs, who’s path moves the same way.
- Reduce front legs rotation

Create Head and Up/Down Animation
- Create Head (elipse) and parent (pick whip) the legs to it
- Animate heads position up and down
- Refine leg animation in master leg
- Turn head into editable path and
- animate on up and down position.
- Offset path animation to up and down and fine-tune graph.

Add Eye-Rig with controller for direction and blink
Eyes should be easily controlled to blink and the pupils should have a controller to move them around.
- Eyeball:
Create a white rectangle by double clicking on the rectangle tool. Set an outline if desired. Set size to 100 x 100 and set the roundness to 200 so you can later also scale up the eyes. - Pupil:
Duplicate the eyeball make the filling dark and reduce size to 20.
Parent pupils to the eyeball.
Add filter “Set Matte” to pupil with eyeball as Matte. - Blink Controller:
Create a Null Object and call it “Blink Controller”. Pick whip eyeballs “Rectangle Path” Size to the Scale of the Blink Controller. - Pupil Controller:
Create another Null “Pupil Controller”. Position it to 0. Pick whip the Pupils Position and Scale to the controllers P and S. - Master Controller:
One more Null “Master Controller”. Pick whip the eyeballs to it.

You can now let the eyes blink and move them around as well as the pupils.
Setting up alle these different controllers and parenting can be quite daunting. To help you understand here is a rig structure of eyes and their parenting and controllers.

Rigging up eyes can be super fun. If you enjoy this and want to know more have a look at this as well:
Animating Eyes by Ben Mariott
Eye Rig Tutorial by Motion Design School
Advanced Shape Layers for eyes and more by Alex Deaton
Animating a simple Walk Cycle
In this very simple walk cycle we’ll combine our new knowledge. We’ll create paths for legs and arms and animate them by using the things we’ll already learned. Also we’ll be working with parenting and overlapping motion to get a nice and “natural” effect.
Create Character in Illustrator and Import File
You can create your own character or use the chicken provided. If you create your own make sure you have the same elements (legs, body, arms, head, …) and all are in separate layers. It’s best if you create a copy of my Chicken.ai and then put your own arms, legs, body, head etc. in the layers already there. For this exercise the legs and arms should be simple paths.
Create a new file in AE or work in the practice file. Import your AI.
Open the composition settings by pressing command + k and set our comp to 24fps and 8 sec. long.
IMPORTANT: We’ll work with a frame rate of 24 fps because this way we can split it into parts of two and that’s easier for setting up your animation.
Create Shapes for all layers

We’ll transform the Illustrator layers into shapes first.
To do this right click the AI Element and select “Create -> Create Shapes from Vector Layer”. Then delete or hide the vector layer.
To find the paths (to animate or change them) you have to dig a bit into the shape layers hierarchy or use the search field.

If unwanted artboard paths appear you have to manually delete them or like I showed in the Arm-Video you can also use the “Motion Tools 2” Plug-In.
For the legs and arms we’ll create paths directly in AE, like we did in the jelly fish example so don’t worry now if all your arms and legs are in one layer. This is just for reference.
Move Anchor Points for animation elements
Dont’t forget to move all Anchor points to where you need them to be BEFORE starting to animate. It get’s super fuzzy once we started animating to move them.

So make sure your Layer Controls are visible and go to the Pan Behind tool. Now select one of your elements and drag the anchor point to it’s required position. You can add the Command key while dragging for Snapping.
Add Guides
To keep the walking motion steady, we have to make sure that the legs move linear once they hit the ground. To help us we’ll create Guides.
Press Command + R untill you see the rulers and drag in the Guides.
We’ll need three vertical ones (space them equally) and at least one for our Baseline.
Marker Points for walking motion and Composition length

Add points for every important step of the movement by dragging in from the Marker Point Icon on the right of the timeline.
Start with a marker at 2:00 second so you have time before for overlaps. Name them by double clicking on them. Add a marker at every 6 frames. Command + click if you want to erase a marker.
RIGHT legdown – Left leg Up – LEFT leg down – Right leg Up – RIGHT leg down

Also drag the Composition starting point and end point to the beginning and end of your markers
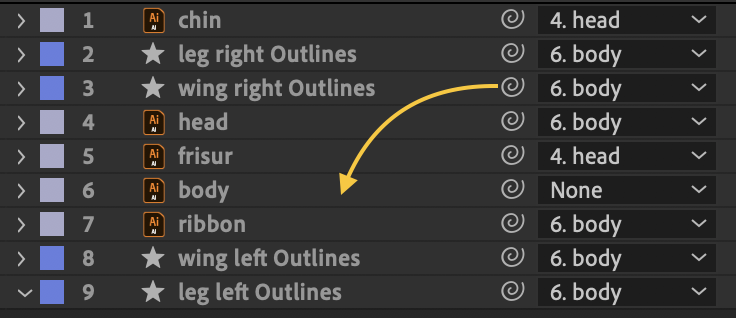
Parent all the layers correctly
For our Chicken we need to parent the following layers.

Chin, hair, beak follow the head.
Head and ribbon follow the body. Legs and Arms will be created later and will be following the body too.
The body is now the boss in this hierarchy so if you move it, all the other elements will move with it.
Animate Body Up and Down
Next we’ll start by animating our body up and down. It’s good to do that first, because the body position will influence our legs and their bend.


Create and animate Legs in Walking Poses
Now we’ll create the legs. We’ll start with the right one first. Create a shape layer named “LEG – Right” with a path for your leg and parent pick whip it to the body.
We’ll create keyframes for this path at our markers for “RIGHT down”, “Left UP”, etc. first and then start to fine tune the in-betweens. Also offset your body up-down a bit before you start.
Arms Rotation with Overlapping swinging motion
For the Arms we’ll also start with just one new shape layer and path and animate this first and when we’re satisfied we’ll create copies.
The animation will be almost like in our waving arm example. We’ll use CC Bend It and Rotation for it and a little offset keyframes for overlapping animation.
Head Up and Down + Rotation
Secondary motion (beak, hair,…)
Let it walk!
Now that we have finishes the animation part, let’s put our chicken into a scene and let it walk through.
Create a new composition 6-8 sec. long and 1920px by 1080px.
give it some background colour with a Solid Layer. We’ll use Time Remapping to only loop the frames of our walk cycle.
Frame by Frame
Animating Frame by Frame means you draw a new image every frame (or every second, third,..) and then play those images after each other.

Frame by Frame is how old school animation was done before computers and it has quite a revival in the last couple years due to it’s classic look and the wide availability of software to create it with. Photoshop, After Effects, Animate, Procreate, Affinity Photo, just to name a few.
For our quick look into the topic we’ll use Adobe Animate. It’s nice to draw in, frames are created easily and it has onion skinning for a good overview of your frames. Let’s jump into it.
Know How before we start
Animating on ones or twos
Please watch this video to get to know the process of animation on different frame counts:
Straight Ahead or Pose to Pose
Swoosh animation in Animate
This was just a very simple introduction into working in Animate with Frame by Frame. If you like this and want to work on a more complicated project I recommend this tutorial.
The voice over is weird, but the content is great 🙂
Know How
Expressions
This is a very big part of animating in After Effects and gives you so so many opportunities to animate easier and quicker.
If you are into After Effects animation you should have a look at them and learn at least the very basics. And you’ll learn some basic Javascript on the way. Win win!!
If you want to learn a few more Expressions here are a few links as starting points.
Six essential Expressions you should know – School of Motion
Amazing Expressions tutorial – School of Motion
4 Advanced After Effects Expressions Made Easy – Motion Design School

Parenting, Rigging
Parenting is the process of setting up multiple layers so that the movement of one layer follows the movement (rotation, scale, anchor points and position) of another layer. In animation it’s also called Rigging.
Parenting whole layers
Use the parent pick whip tool to parent one layer to another.
Click and drag it from layer A to layer B.
Layer A then follows layer B.
Parent single properties
If you for example want only the rotation of layer A to be the exact same value of layer B’s rotation you can do this by dragging the property pick whip.
This adds an expression to layer B’s value that tells it layer A’s value.
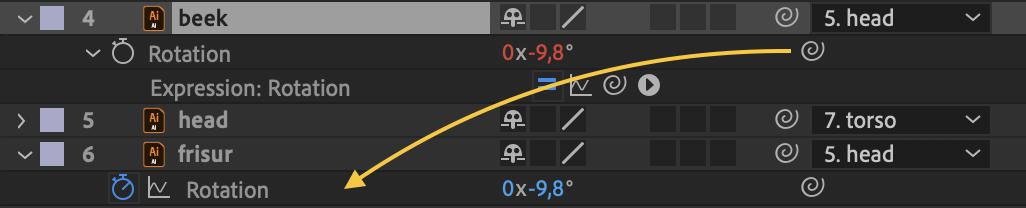
You can even pick whip one properties value to a completely different property.
F.e. try this with two layers and pick whip one’s rotation to the others x-position.
Exercise
In our main After Effects File PM-Character_Animation.aep you’ll find a folder called Training. In it is a comp called: Pick-Whip-parenting.
Open it and work on the tasks described to practice pick whipping.
Where will we need this
Parenting is used if you want to only animate one thing and others should do the same. It is also used extensively in character animation setups.
Here’s an example of another very simplified character parenting. You see that it works like a tree where everything is attached (parented) to the next bigger thing.

Loops
A Loop is a structure, series, or process, the end of which is connected to the beginning.
You can loop one particular movement or a whole sequence consisting of multiple animations.
In AE you can manually create loops by duplicating keyframes where the last keyframe should always match the first one.
Or you can add expressions to the property you want to loop. Basic expressions for looping are for example:
loopOut(“cycle”);
for repeating after the keyframes
loopIn(“pingpong”);
for back-and-forth before keyframes
Easing
Also called Slow-In and Slow-Out
In Animation, the term for motion that starts slowly and accelerates is “slow out,” and for motion that starts quickly and decelerates is “slow in.” The terminology also used for these are “ease(ing) out” or “ease(ing) in”.
CAUTION: There’s a potential for confusion in this terminology. If you read a traditional animation book such as Disney’s The Illusion of Life or The Animator’s Survival Kit, they’ll tell you that, when an object starts slow and then picks up speed, it’s called ease-out, as it is “easing out” of its pose (or keyframe). This is also how After Effects treats it. But, in more web based software and programming (CSS animation, Adobe Animate, etc), it’s opposite and this is called ease-in! I’m not sure how this difference came to be, but unfortunately, that’s how it is.
It seems classic animation is more focused on the poses/keyframes as in “easing out of a keyframe” and CSS & co more on the motion as in “easing out of the motion”. At least this is how I remember.
These images from Principles of Animation show what we’ll work with in classic animation lingo.


And this is what the corresponding motion and graphs will look like played in pingpong:


Overlap
Overlapping Action is another of the cornerstones of animation. By overlapping the actions of a characters’ body, hair, tail, clothing, etc. your animation will feel more fluid and life-like.
In life, everything moves at different speeds and at different times. OVERLAPPING ACTION is a tool used by animators to emphasize the action and mood of the character. When a character moves across the screen some parts of the body move before or at different rates than others. Some parts of the body will LEAD the action and some parts will FOLLOW the main action.

Rendering
If you want to create a movie file out of your animation you must render your file. There are several ways to do this and Adobe provides basic explanations on them here. Or watch this tutorial for a more detailed look into the topic.
Render to mov
If you want to render a high quality .mov file, that you’ll compress later (see HandBrake) do the following:
Add your composition to the Render Queue by going to Composition → Add to Render Queue and choose → Render Settings: Best Settings→ Output Module: Lossless.

Render to mp4
If you will use your file for Web and Social Media you’ll need an mp4 and the easiest and quickest way is this:
Add your composition to the Media Encoder by going to Composition → Add to Adobe Media Encoder (Option + Command + M) and choose → Format: H.264 → Preset: Match Source – High bitrate.
You can read an in depth article about mp4 and H.264 here. If you have no clue what a codec or a container is and want to know → read it.

HandBrake
is a really good free compressing software. The mp4 and mov file that will result from the rendering described above can still be quite big so to keep file sizes low please download and install HandBrake.
Once running go to Import and find the “H.264 – fast – same as source.json” preset in Class Files → HandBrake → Class-Presets. This preset is set to H.264 with very good compression while keeping frame rate and dimensions of the original file.
You might also want to use this one with other files, if you want to put them on a website ore even e-mail them.
For comparison:
mov straight out of AE → 17.8MB
mp4 with Media Encoder – High Bitrate → 2,1MB
mov or mp4 compressed with HandBrake and Class-Preset → ca. 420 KB
INFO: This is also how you should render and then compress for your Home Assignments.
Links & Tutorials
A lot of tutorials and knowledge can be found on the youtube channels and Instagram accounts of School of Motion and Motion Design School.
Also head over to Tony Babels Instagram for a lot of “Behind the Scenes” Videos.
I also can recommend having a look at Ben Marriott’s Youtube Channel. Great tutorials and super fun projects. Here are a few great ones:
Frame by Frame
A two hour long very detailed break-down of Ben Mariotts frame by frame process. If you have the time and are interested I recommend watching this:
Custom Textures in After Effects:
Animation of swinging motion with textures:
Frame by Frame Character and more complicated Animation in Animate CC & After Effects Combined
Where to go next?
After this introduction into the world of animating motion and characters in AE and Animate you might want to look at Character Rigging Plug Ins next. These provide a way to create motion-controllers for joints.
Here’s a complex rig created with Duik Bassel.

I personally also love Rubberhose for it’s simplicity. You can try out how it works directly on their website. Here is an animation done by Tony Babel where you can get a glimpse of how it’s used.
Here is comparison video that will give you a good overview, what to use in which situation.